Tilde 3.0 Bal.rs
Written By Team Bal.rsBuilding a simple Load Balancer in Rust
Authors: Pushkar G R, Pranav V Bhat, Rohan Cyriac, Raahithya J
Why do I need a Load Balancer?
Let's say you have a few servers and are hosting a website. Great! Soon your website becomes popular and gets a lot of visitors daily. All well and good until your servers start to become overwhelmed with requests and die. How to fix this? By putting a Load Balancer in between the clients and your servers.
A Load Balancer distributes incoming network traffic and distributes them across multiple servers to ensure no single server is overwhelmed thus optimizing reliability and resource utilization.

A Load Balancer can be physical or a software. It can be further classified base on which layer of the OSI model they operate at.
As part of the Tilde 3.0 Summer mentorship program, the Bal.rs (Pronounced: /ˈbɔːləz/) team have built a simple L7 Load Balancer in Rust. Rust was chosen due to it's performance and safety while provding low level control over the system.
Getting started with Bal.rs
Prerequisites
Building the Application Locally
Clone the repository and build the application using cargo.
git clone https://github.com/homebrew-ec-foss/bal.rs
cd bal.rs
cargo build
For a production-ready build, you can use:
cargo build --releaseUsing the Application
After building, the main executable will be located in /target/debug or /target/release based on the build command used. Navigate to the directory and type
Balrs help startin the terminal to get a list of available commands.
Alternatively, from the root directory of Bal.rs, you can use:
cargo run help startfor the same result.
While you can configure the Load Balancer using the command line interface, more configuration options are available through the config.yaml file and multiple different config files can be created.
This feature enables the use of various configuration profiles without altering the original configuration. The desired profile can be specified through the CLI.
Technical Details
Note that this section covers only the
lb.rsfile which contains the actual Load Balancing code.
There are 3 key components of our Load Balancer:
- Listener: Listens for incoming HTTP requests.
- Routing: Does the actual load balancing by forwarding the client request to the servers.
- Fault Tolerence: Makes sure the Load Balancer handles any faults gracefully.
Listener
We have used Rust's tokio crate to handle asynchronous processing and the hyper crate for networking. Tokio's TcpListener is used to listen for incoming connections

In this code snippet, we create a TcpListener instance to listen for incoming traffic and set it to listen on the address of the Load Balancer.
If the listener is bound to the Load Balancer successfully, we return the listener object for passing incoming requests to the handle_request function or else the error encountered is displayed.
Routing the Connections
There are 3 functions dealing with client requests.
Handling incoming requests:
handle_requestfunction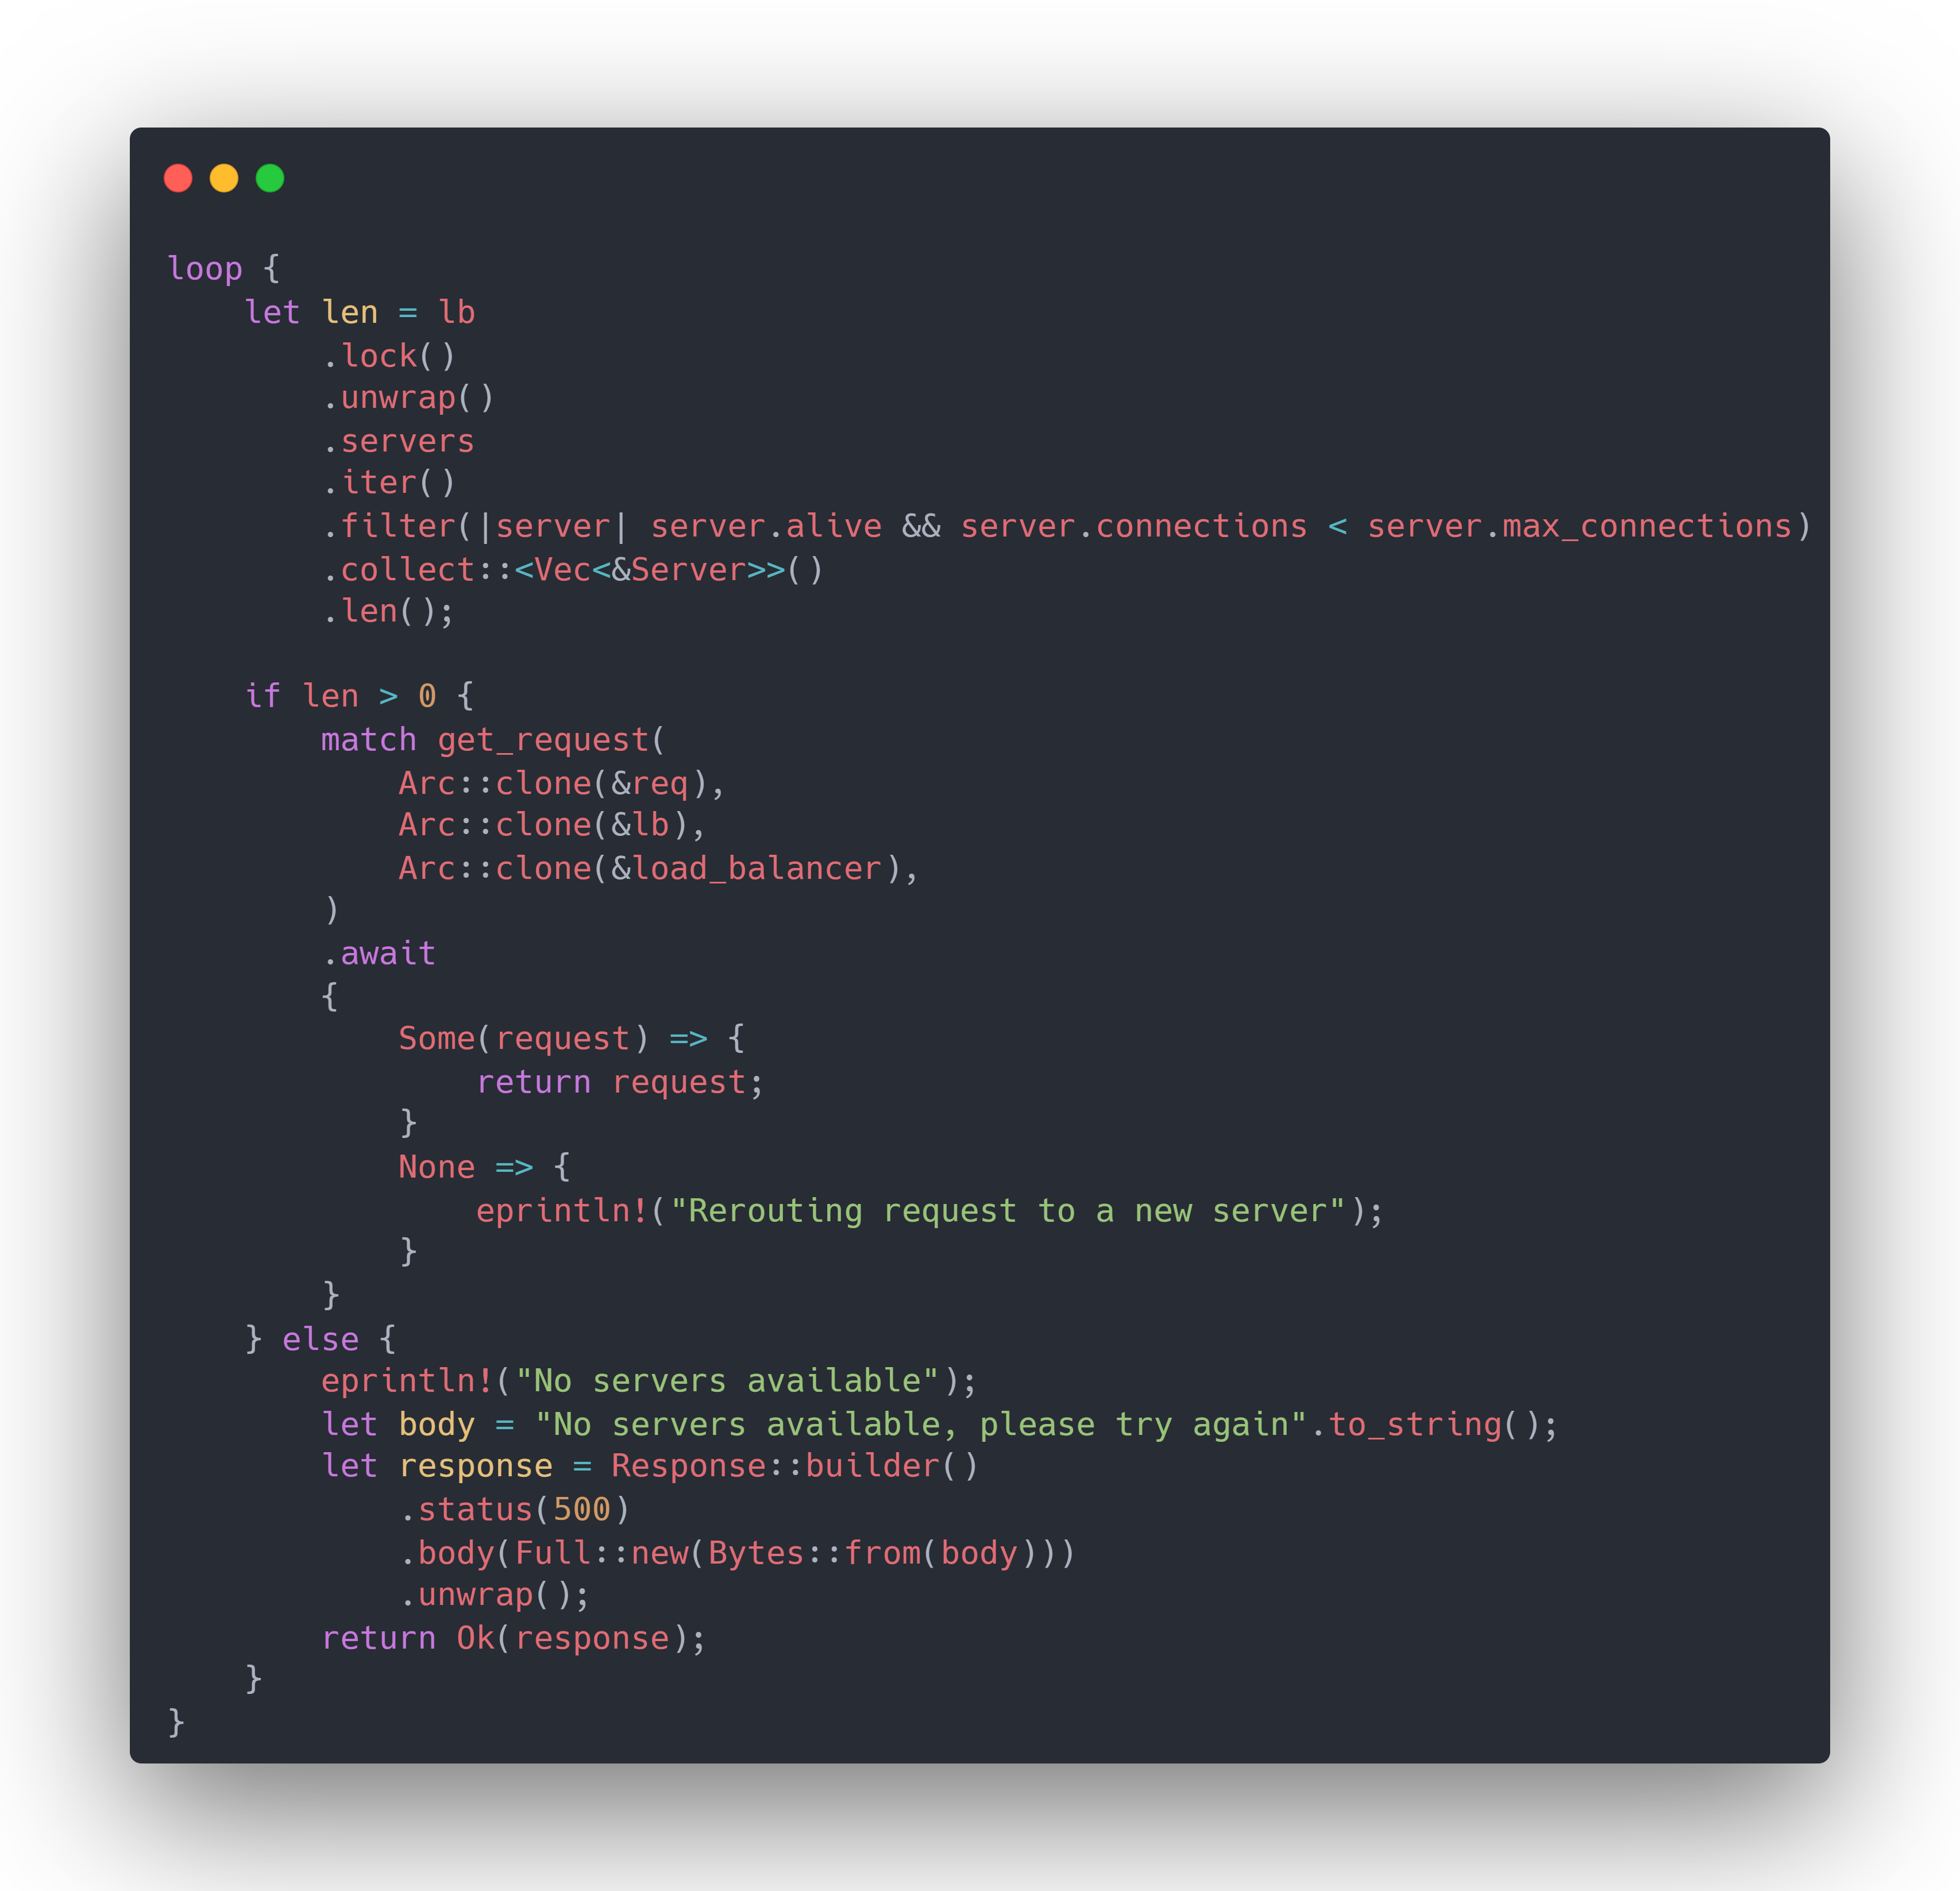
We lock the
LoadBalancerinstance to access the server list and filter out any dead servers.
The function then tries to pass the request to theget_requestfunction. If this fails, a message is logged and the loop restarts. If there are no available servers, a HTTP 500 response is returned.This is a dynamic fault tolerence system that reroutes an incoming request to a different server if one server is not available.

Forwarding requests to server:
get_requestfunction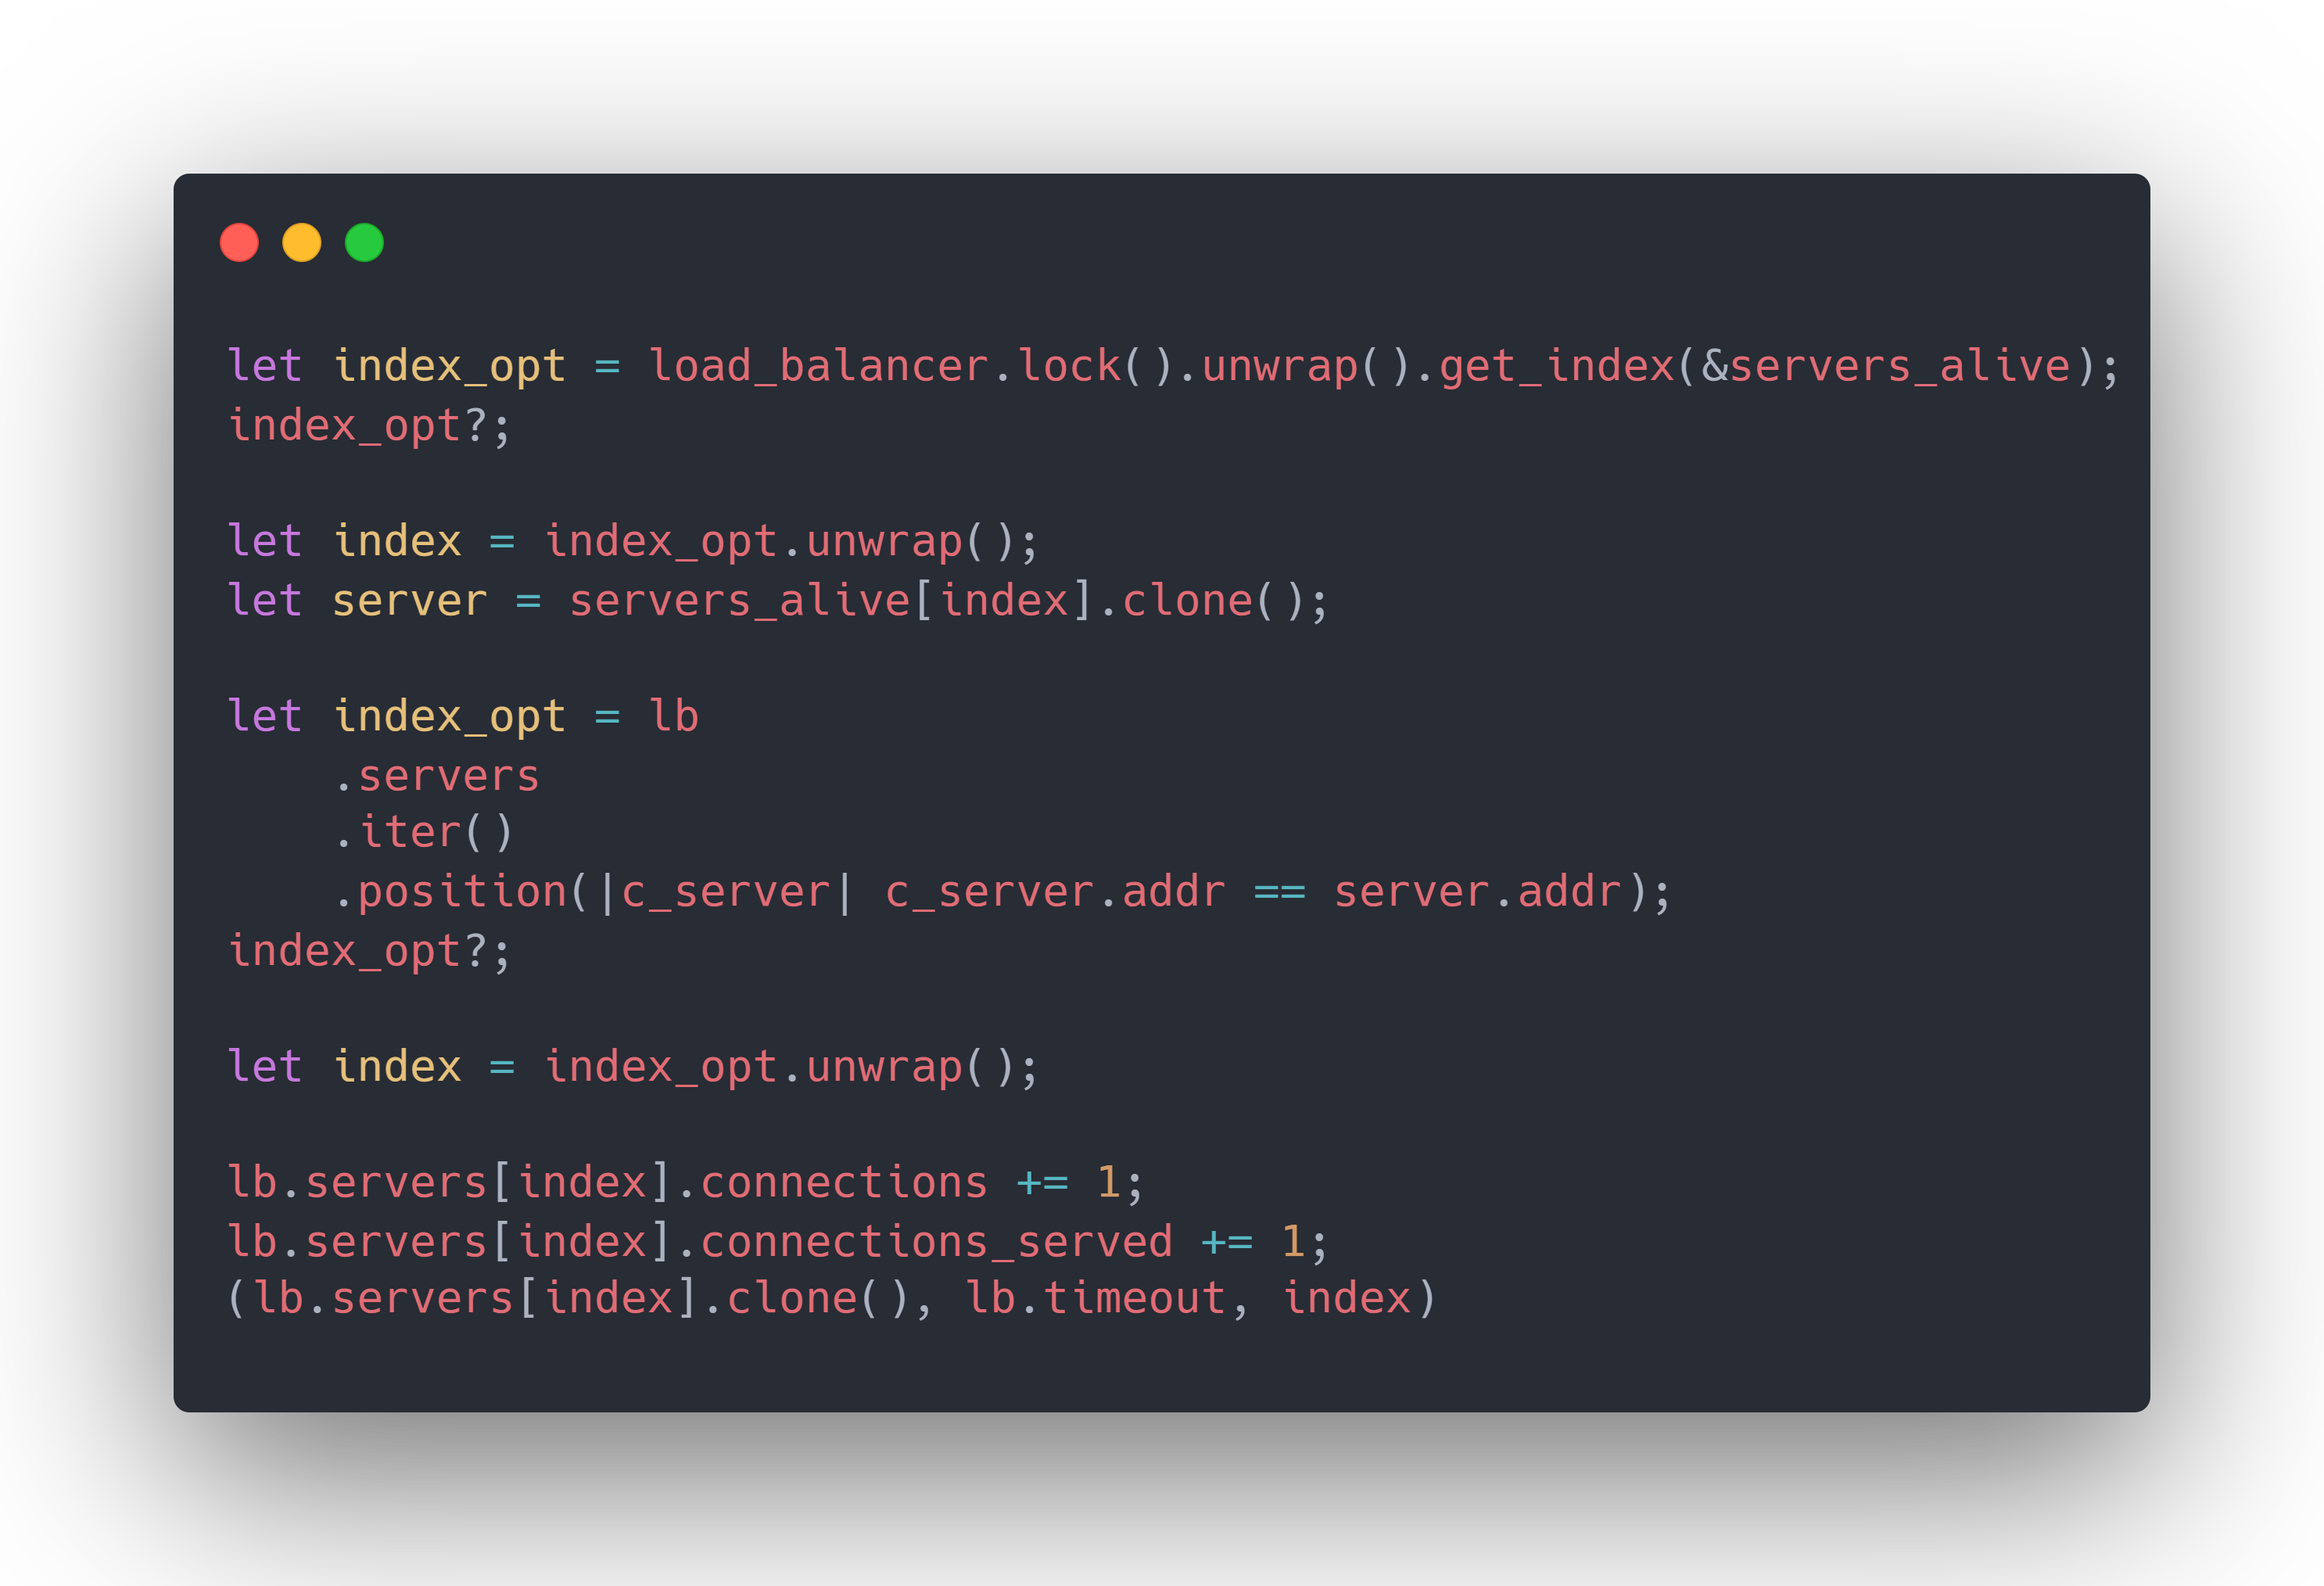
Gets indexes of the servers and selects the server to be used according to the specified algorithm.

Here, the server URL is constructed. Requests are then forwarded to the server using the
send_requestfunction. Along with that, a timer is started to measure server response time. The server response is stored in thedatavariable.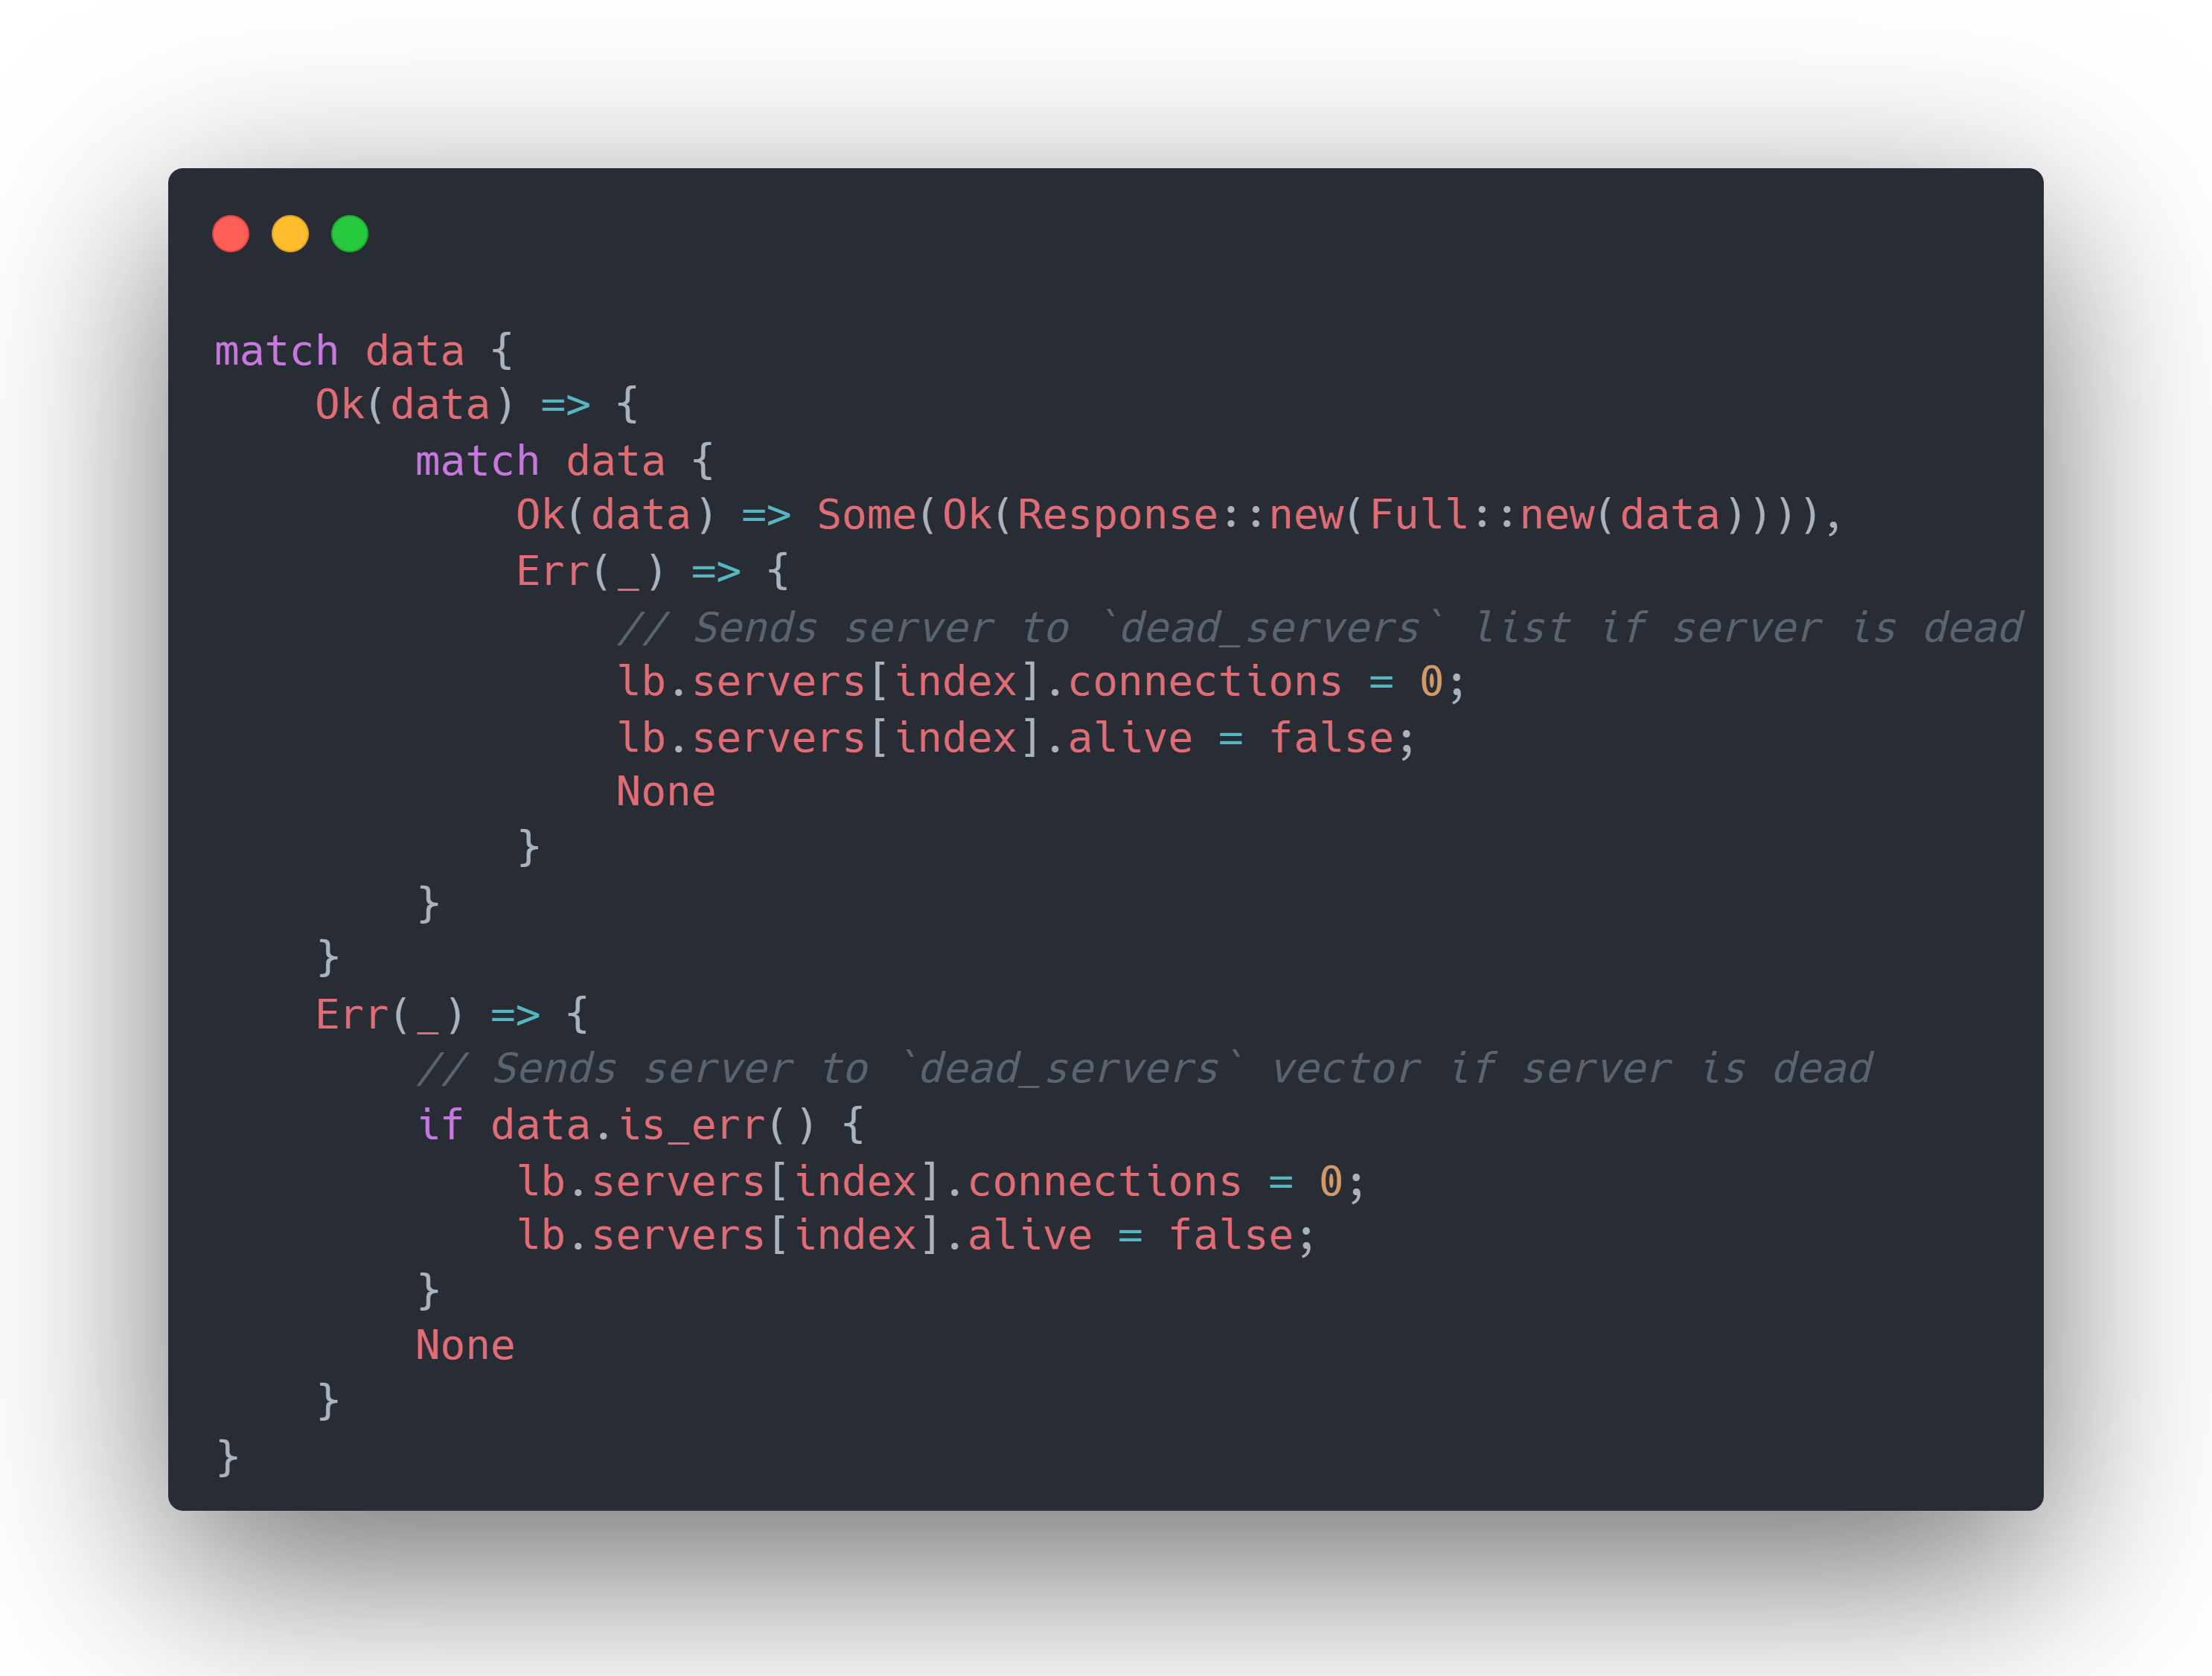
Here, we handle variants of the server response. If we get a successful response, we return the response data or else mark the corresponding server as dead and return
None.Retrieve server response:
send_requestfunction
Parse the URL from the request and extract host and port from it. The port defaults to 80 if not specified. Then format the address to a string for a TCP connection.

Establish a TCP connection to the formatted address and wrap it in a tokio IO adapter so that it can be used with
hyper.
Ahyperclient is then initialised using a HTTP/1 handshake.
The HTTP request is prepared with the given URL and
HOSTheader and sent using thehyperclient.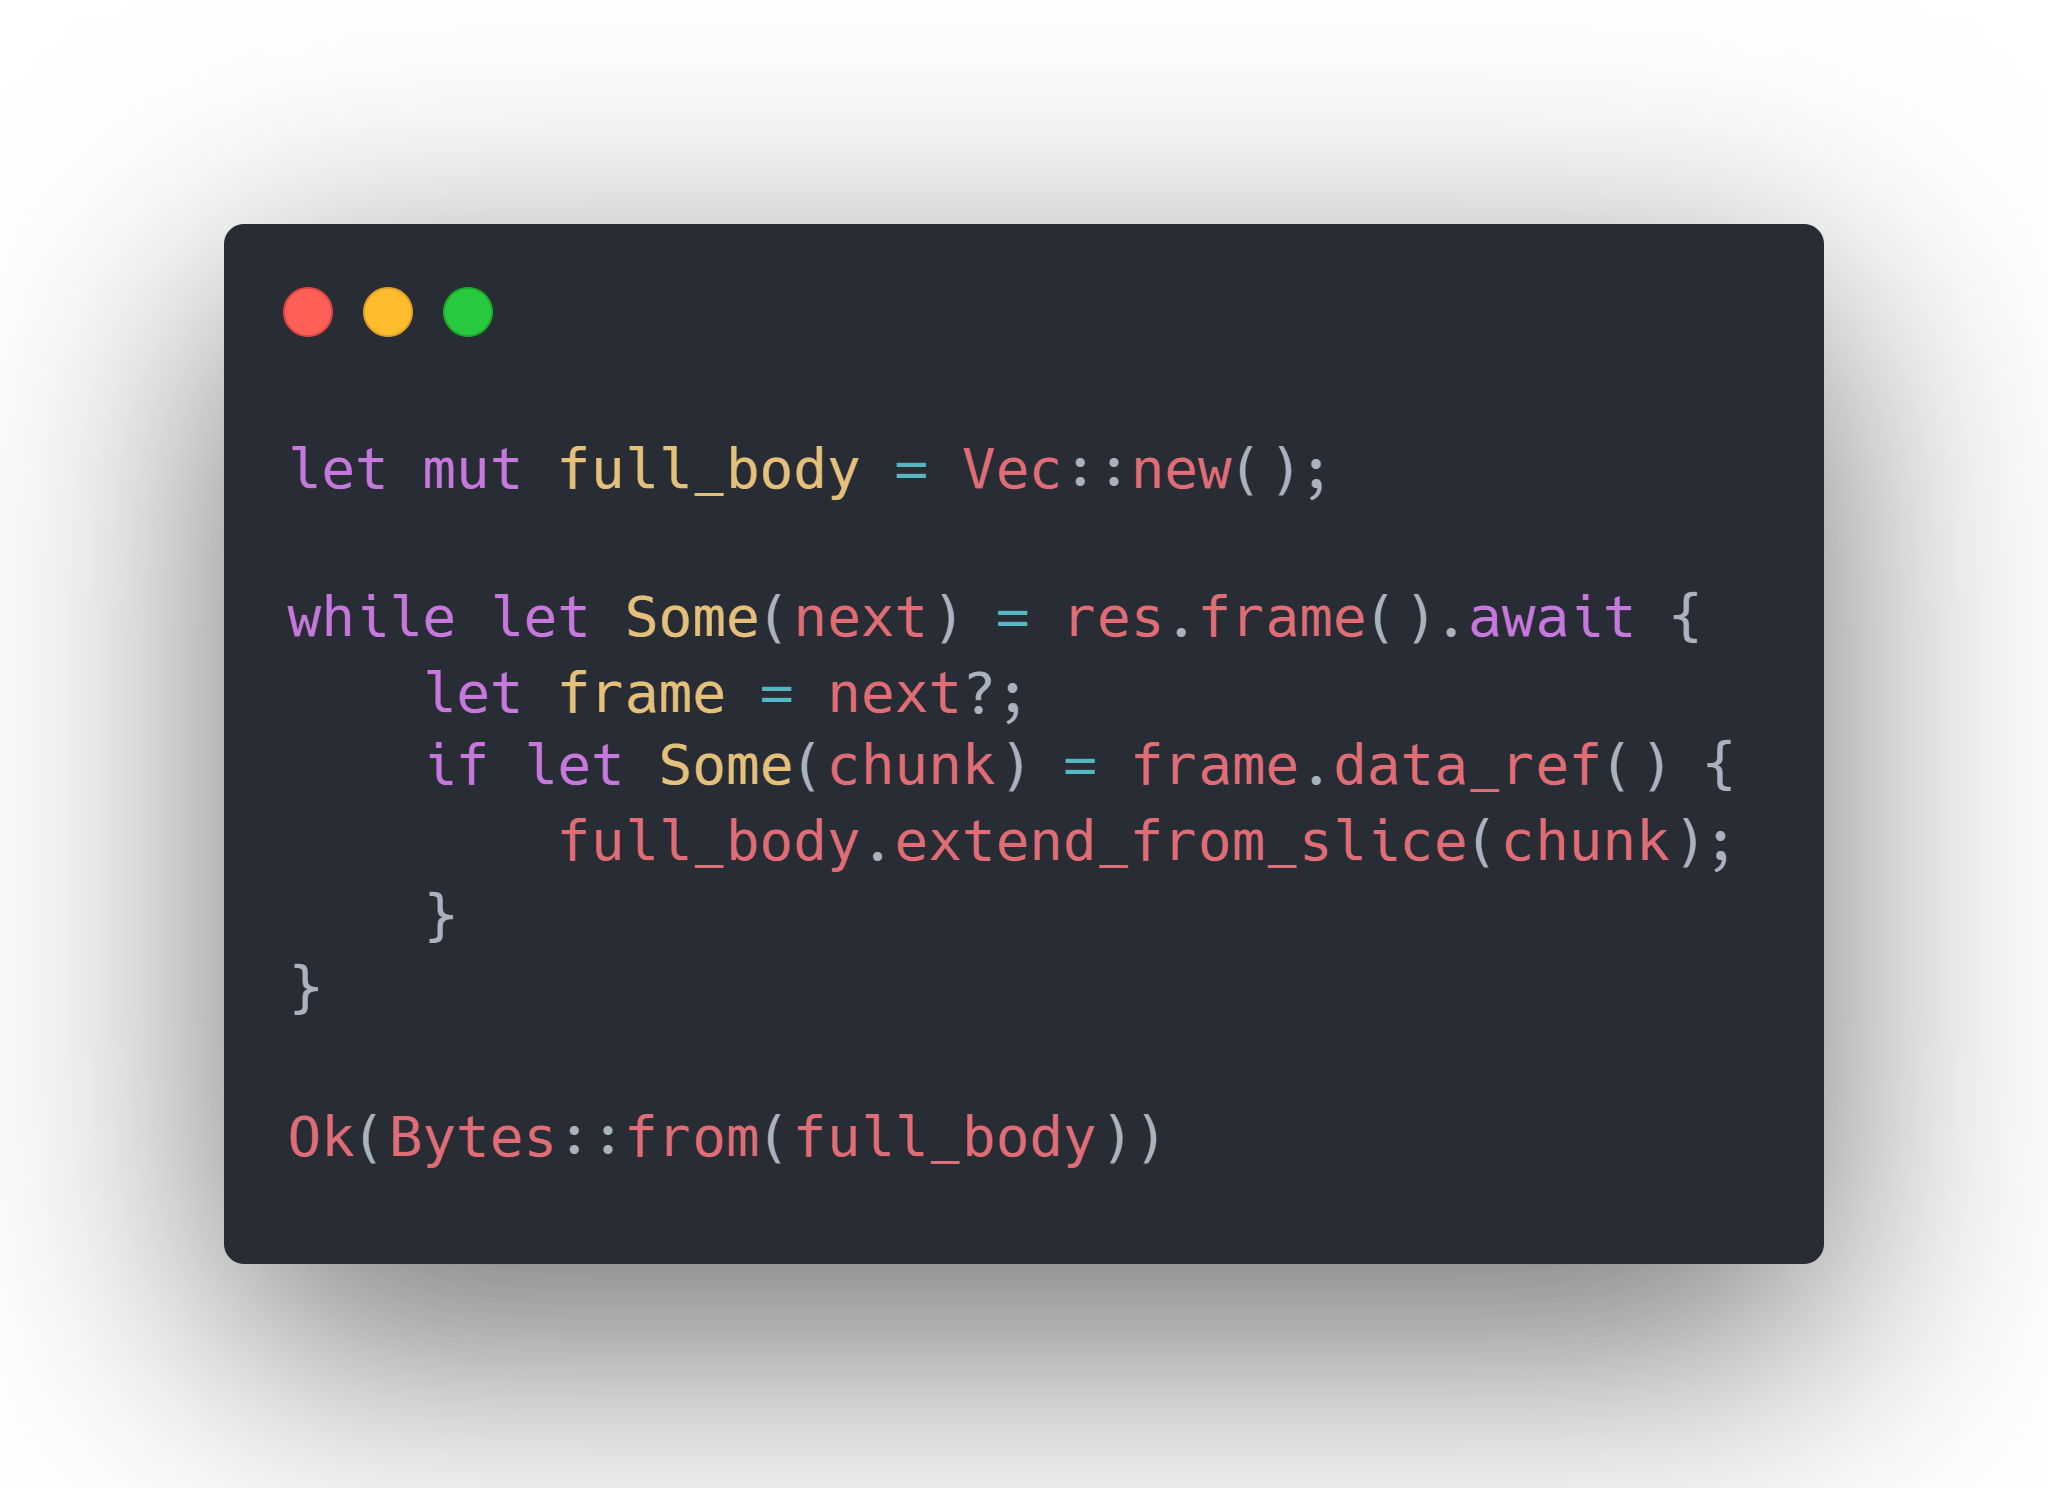
The server response body is then collected in chunks and appended to
full_body. The complete response is then converted toBytesand returned.
Fault Tolerence
This is a slightly large piece of code that ensures smooth functioning of the Load Balancer. So, let's break it down.
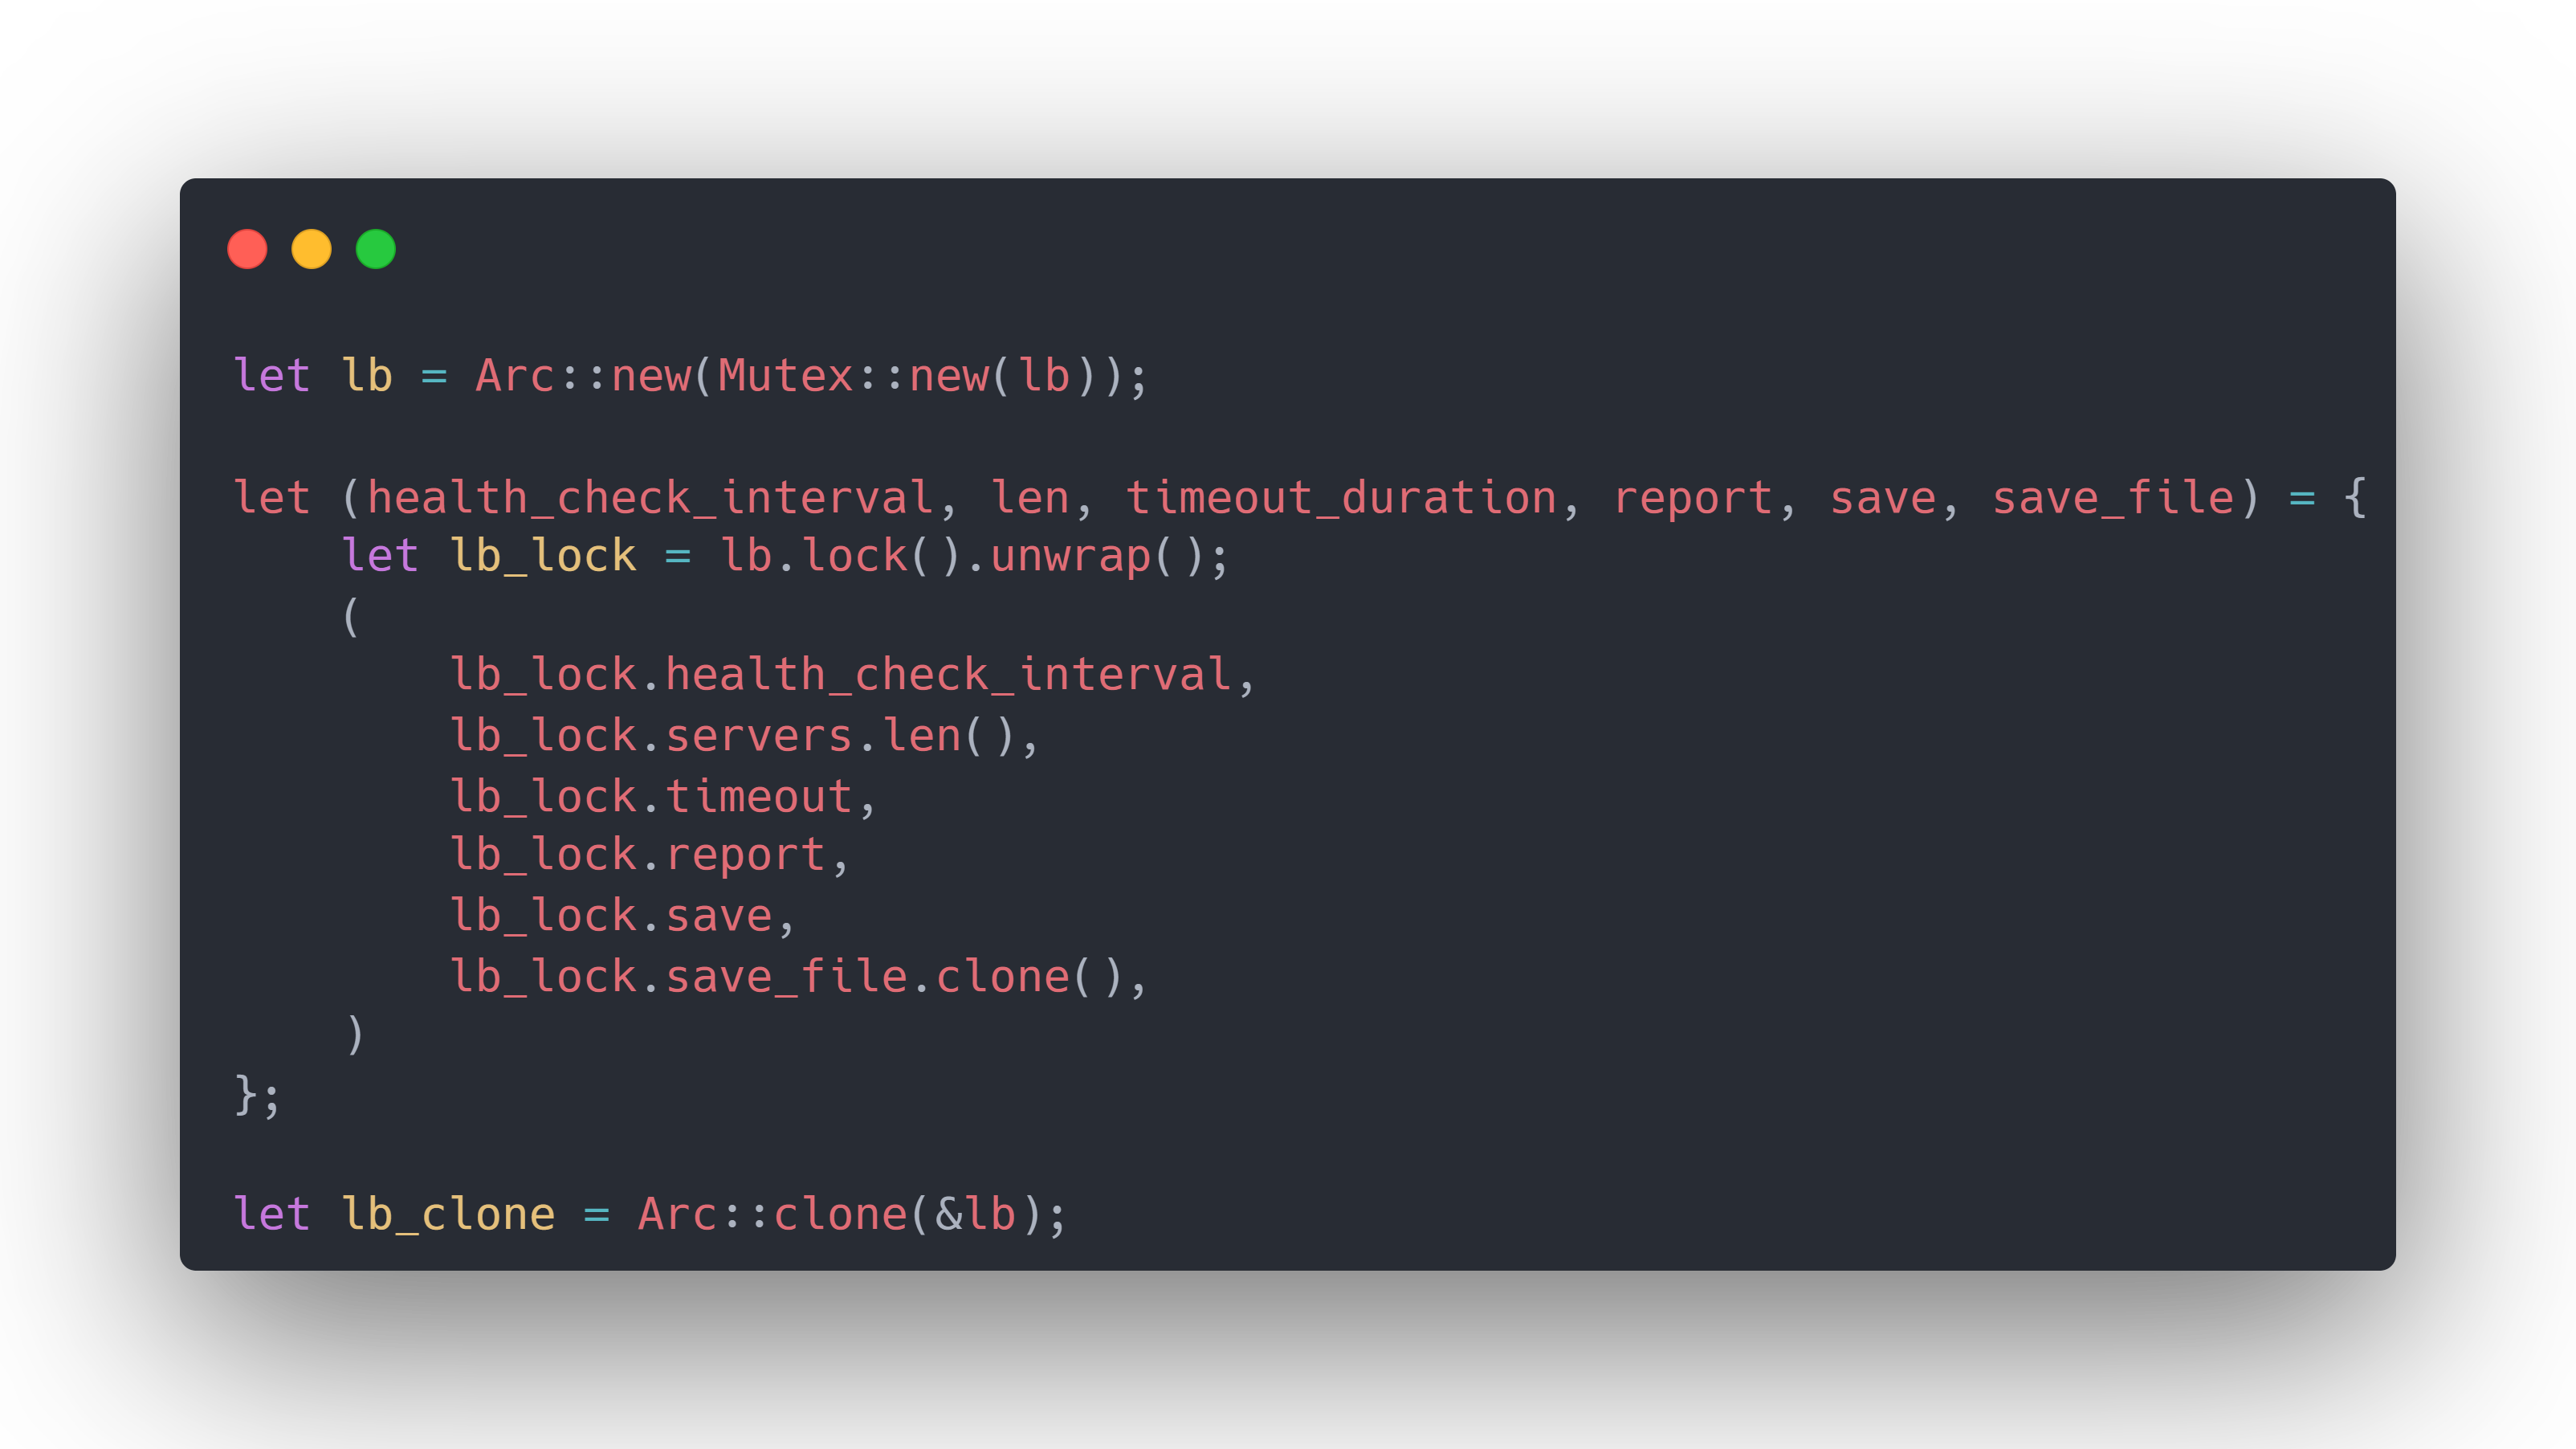
Here, we create variables to store the required configuration values and clone a LoadBalancer instance for further use.
Spawn an asynchronous tokio task for the health checker and create a vector to hold other tokio tasks.
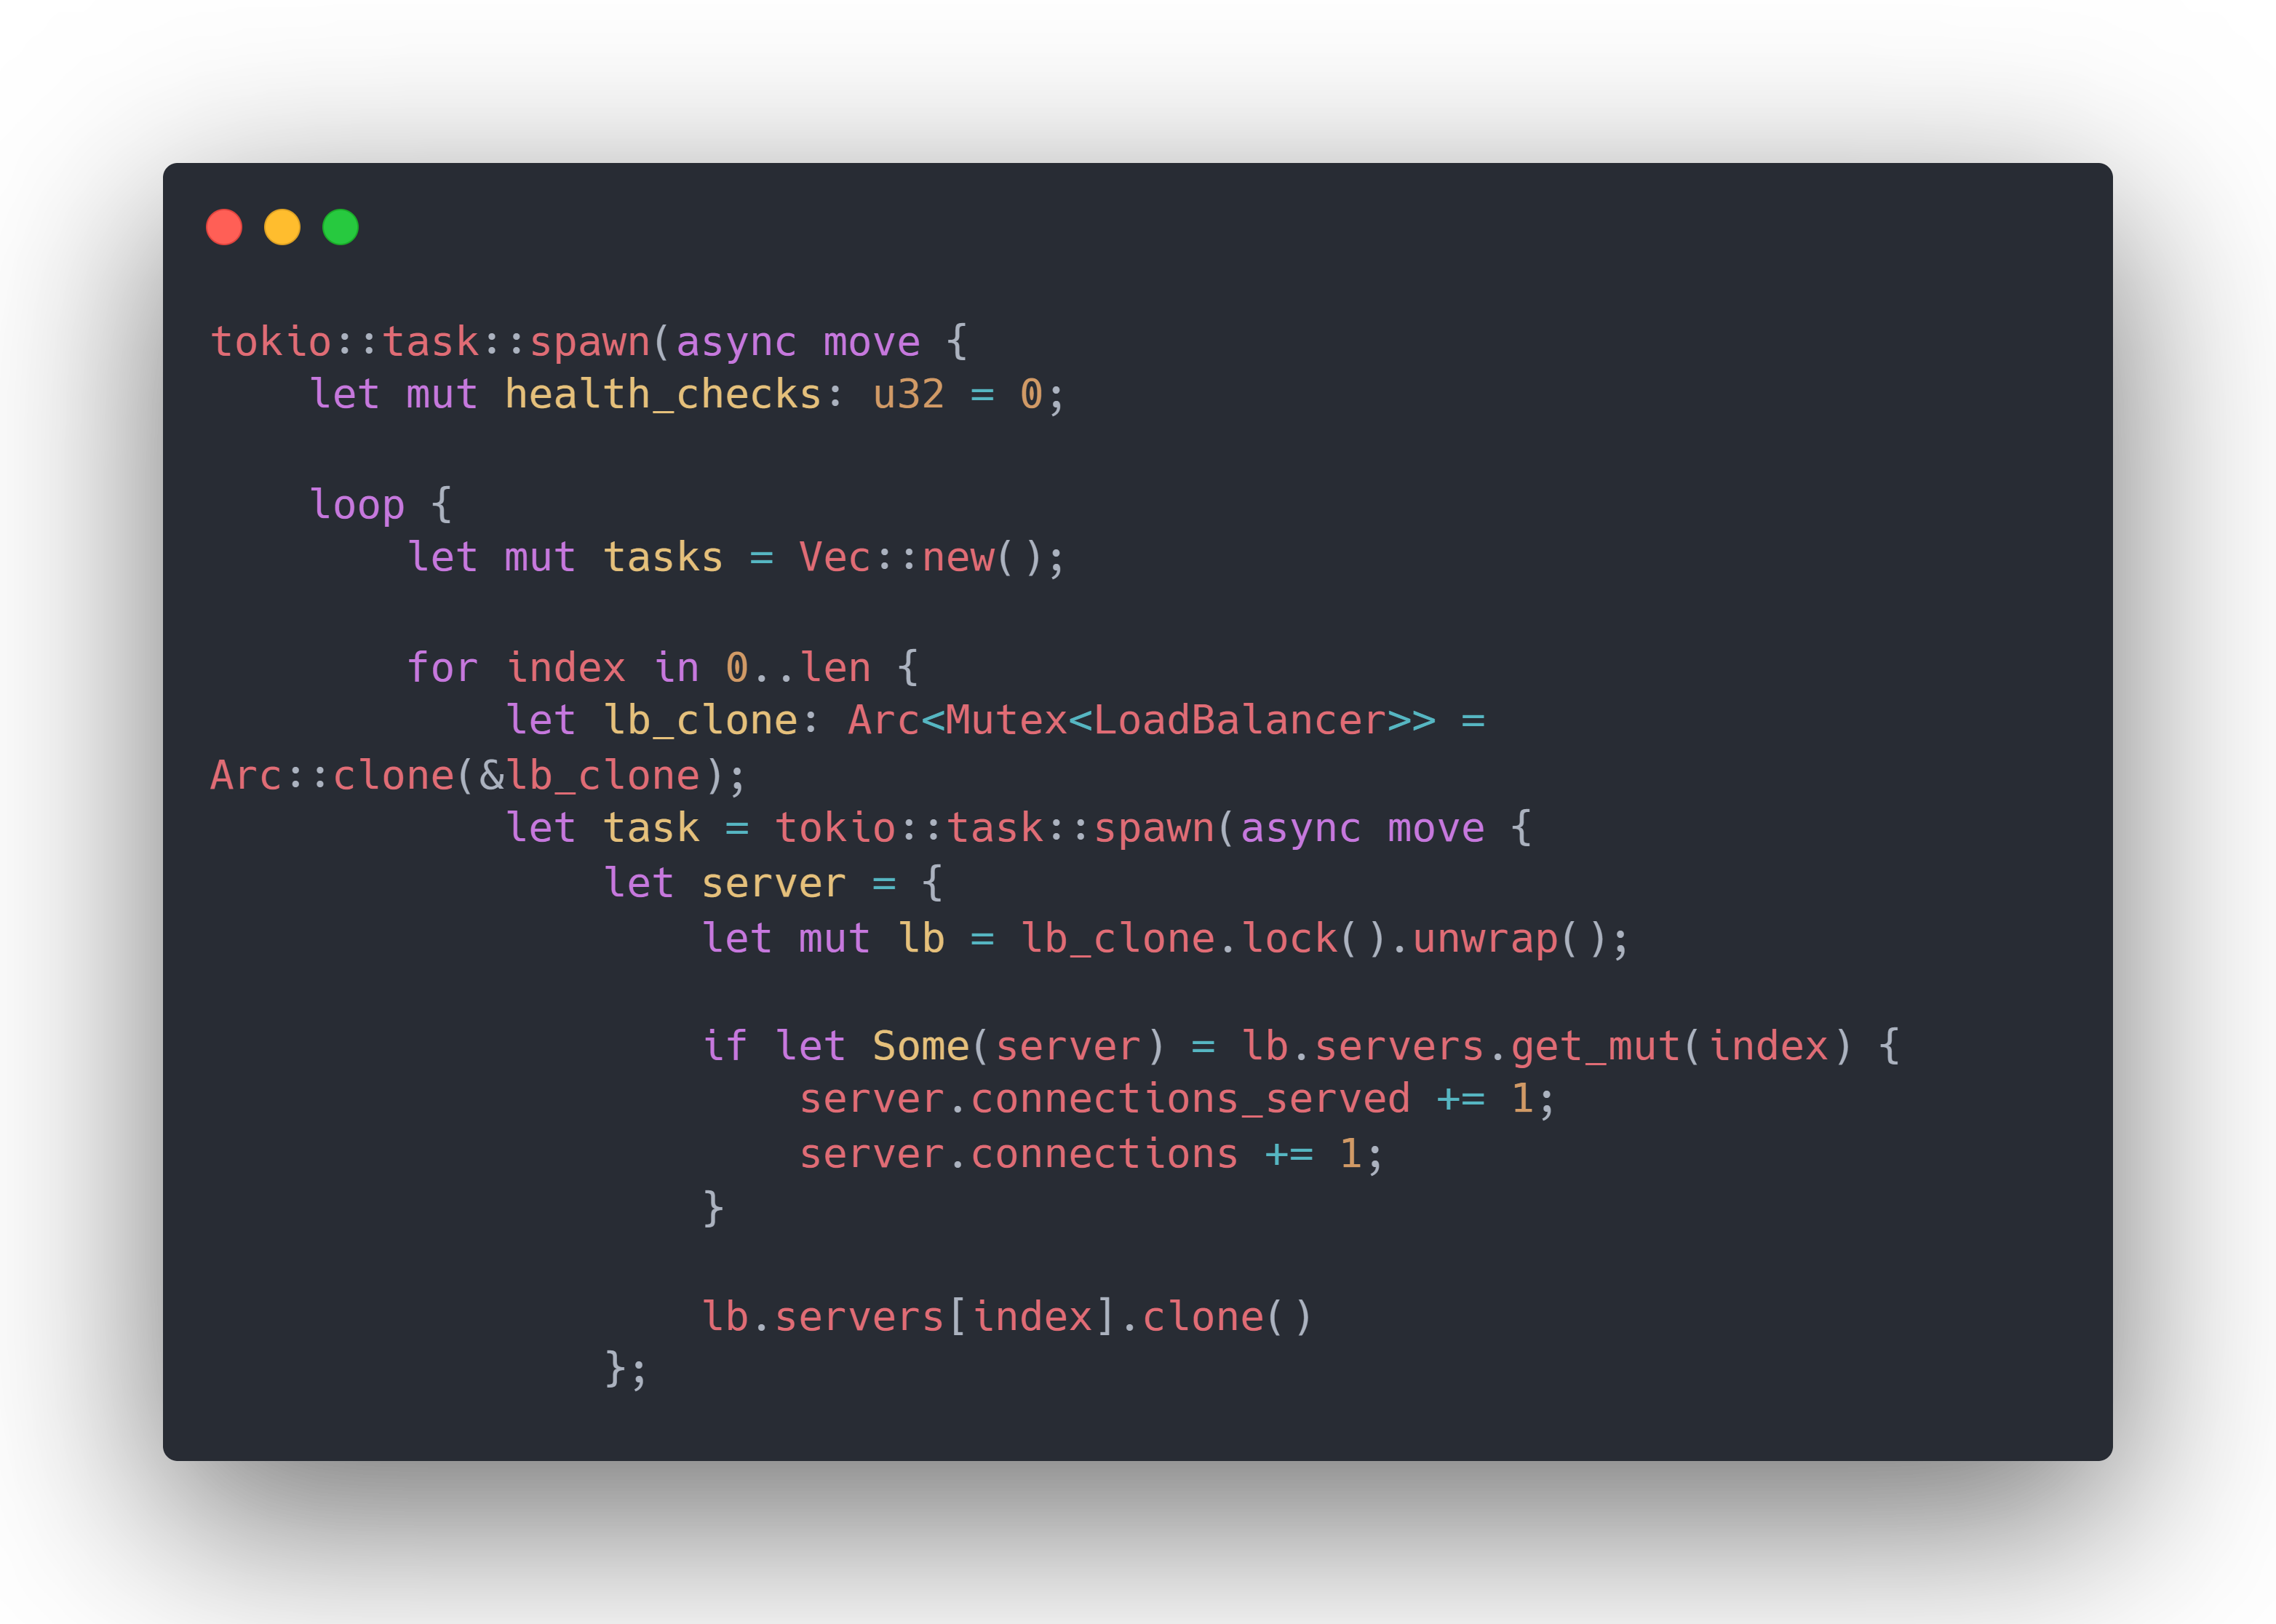
Each task corresponds to the health check for each server. This is done to ensure all health checks happen simultaneously. We create the required number of tasks using a for loop where len is the number of servers listed in the Load Balancer's configuration.
Inside the task for each server, we retrieve and update relevant server data.
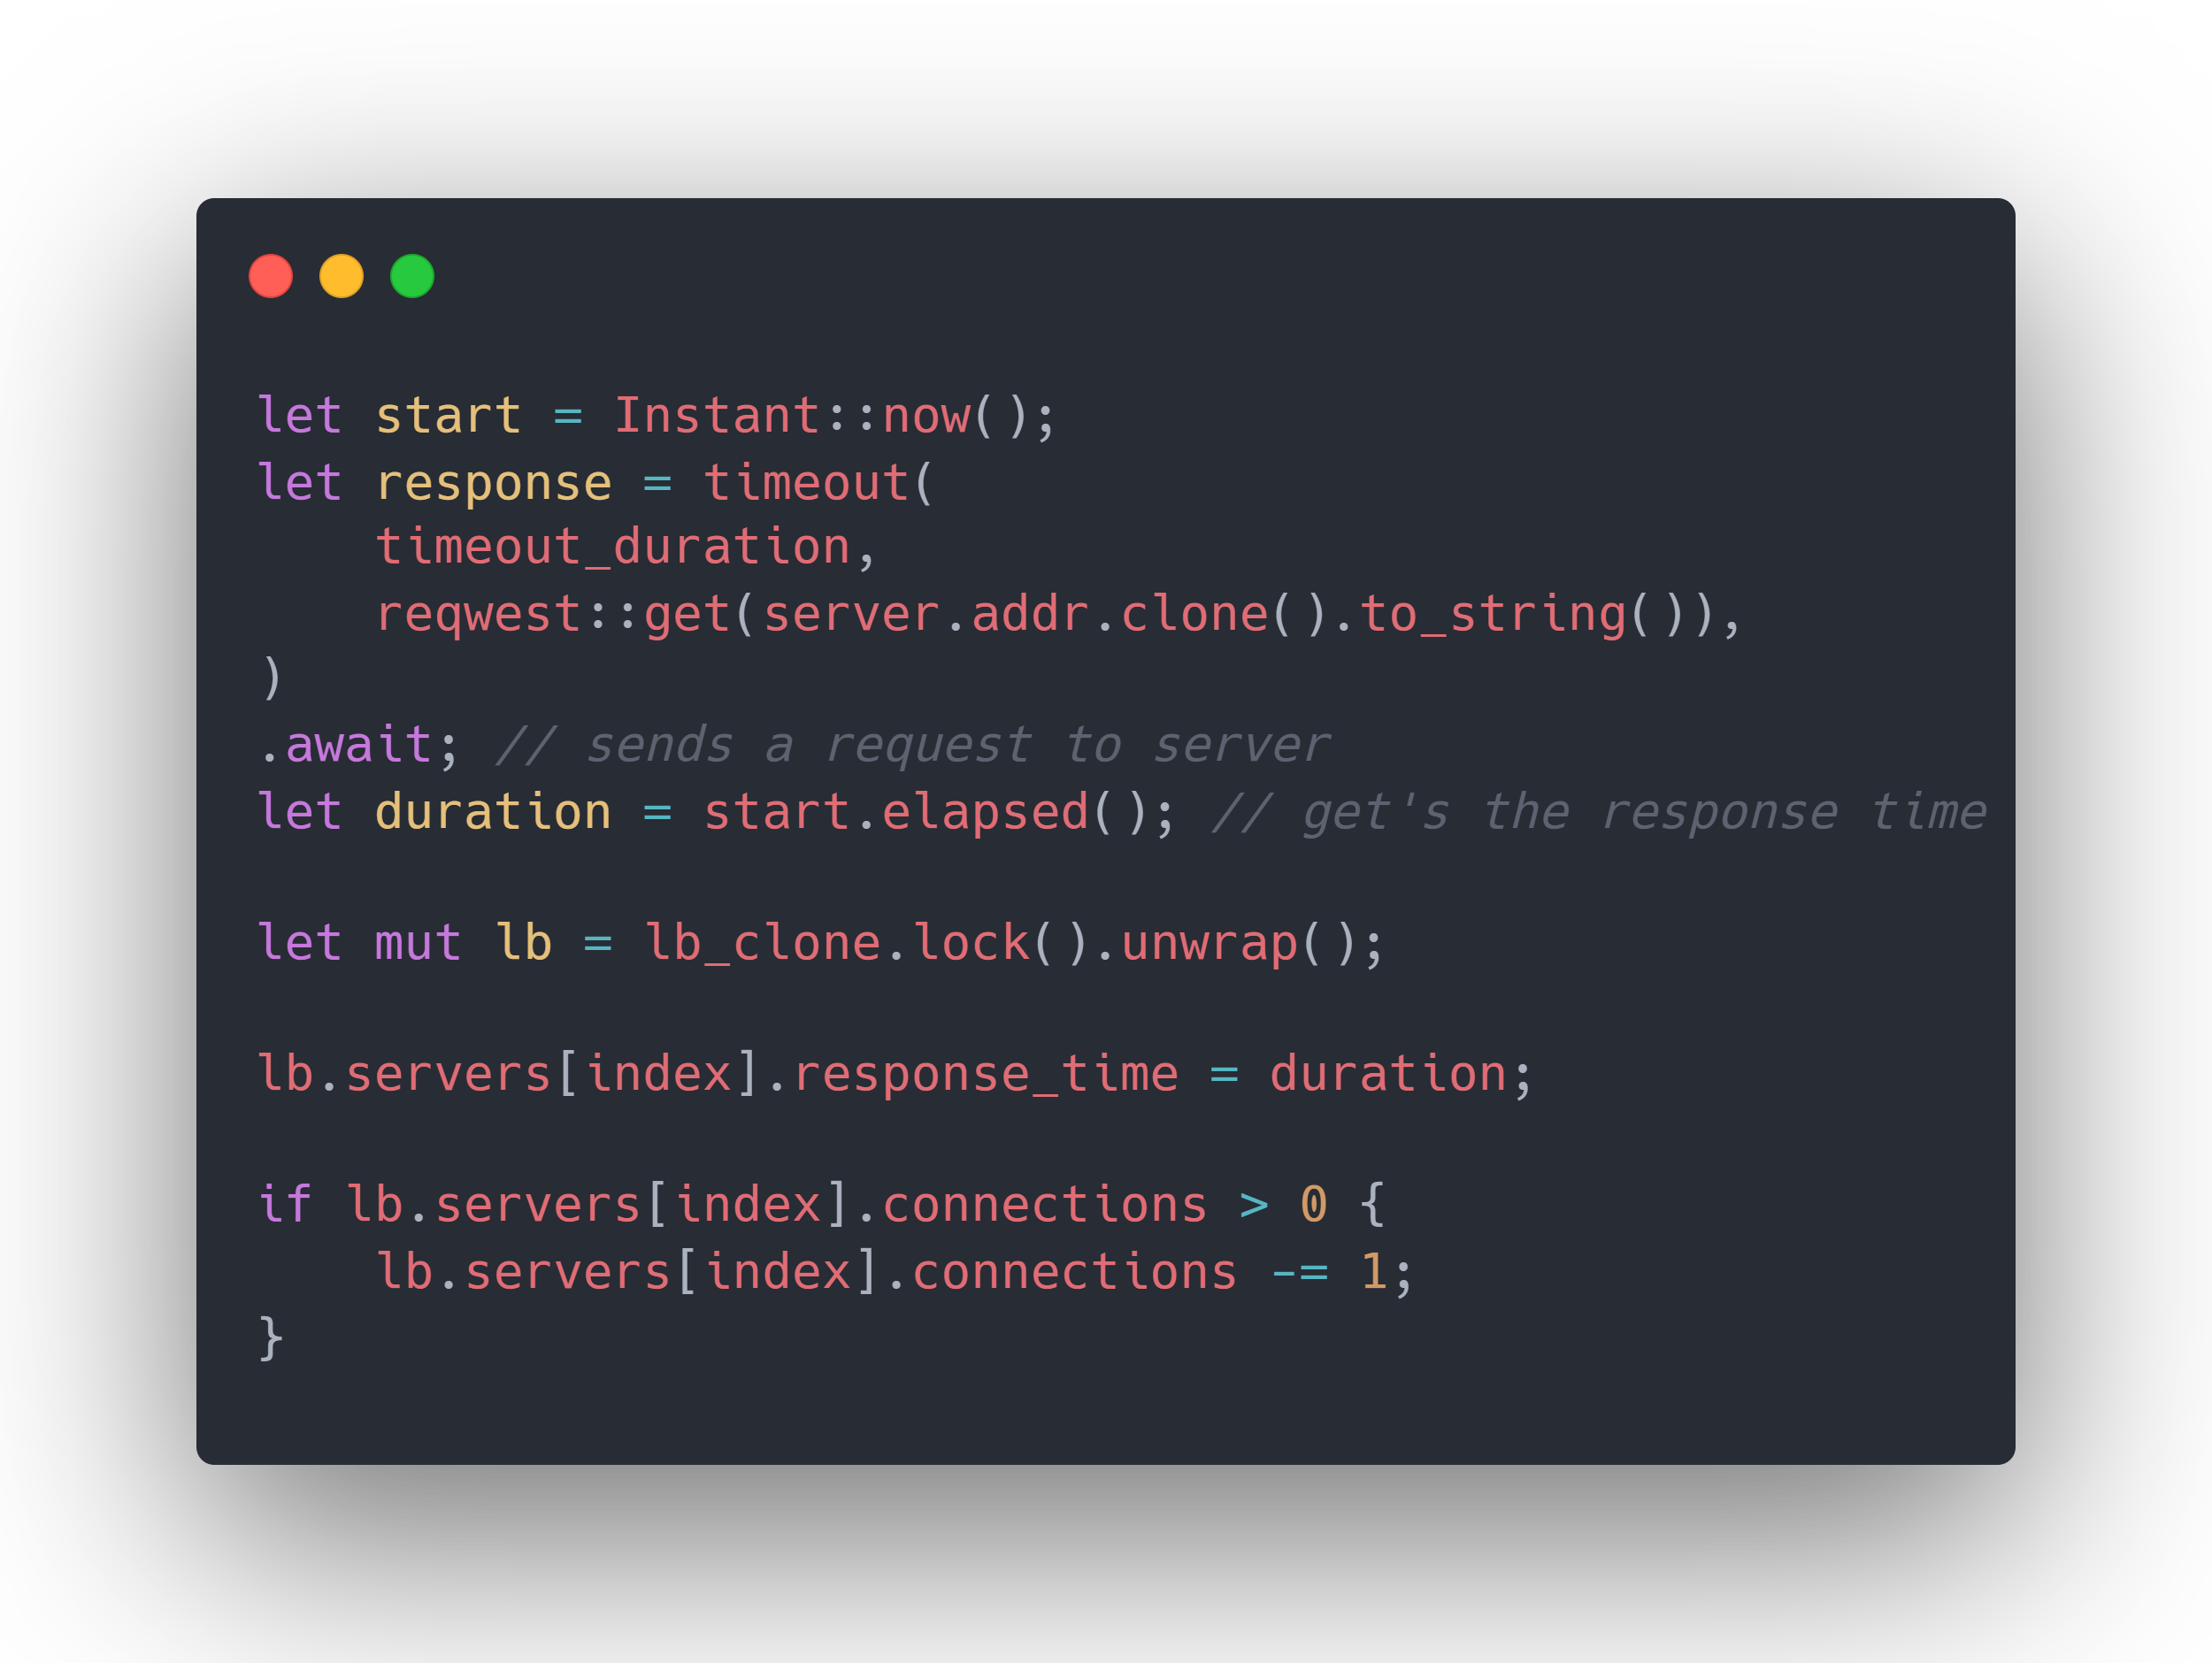
Using Instant::now() and calling .elapsed(), we record the server response time. We check if the server is responding by sending a GET request to each server with a set timeout and then update the server response time.
The subtraction from lb.servers[index].connections is done as to not count the connection opened by the health checker.
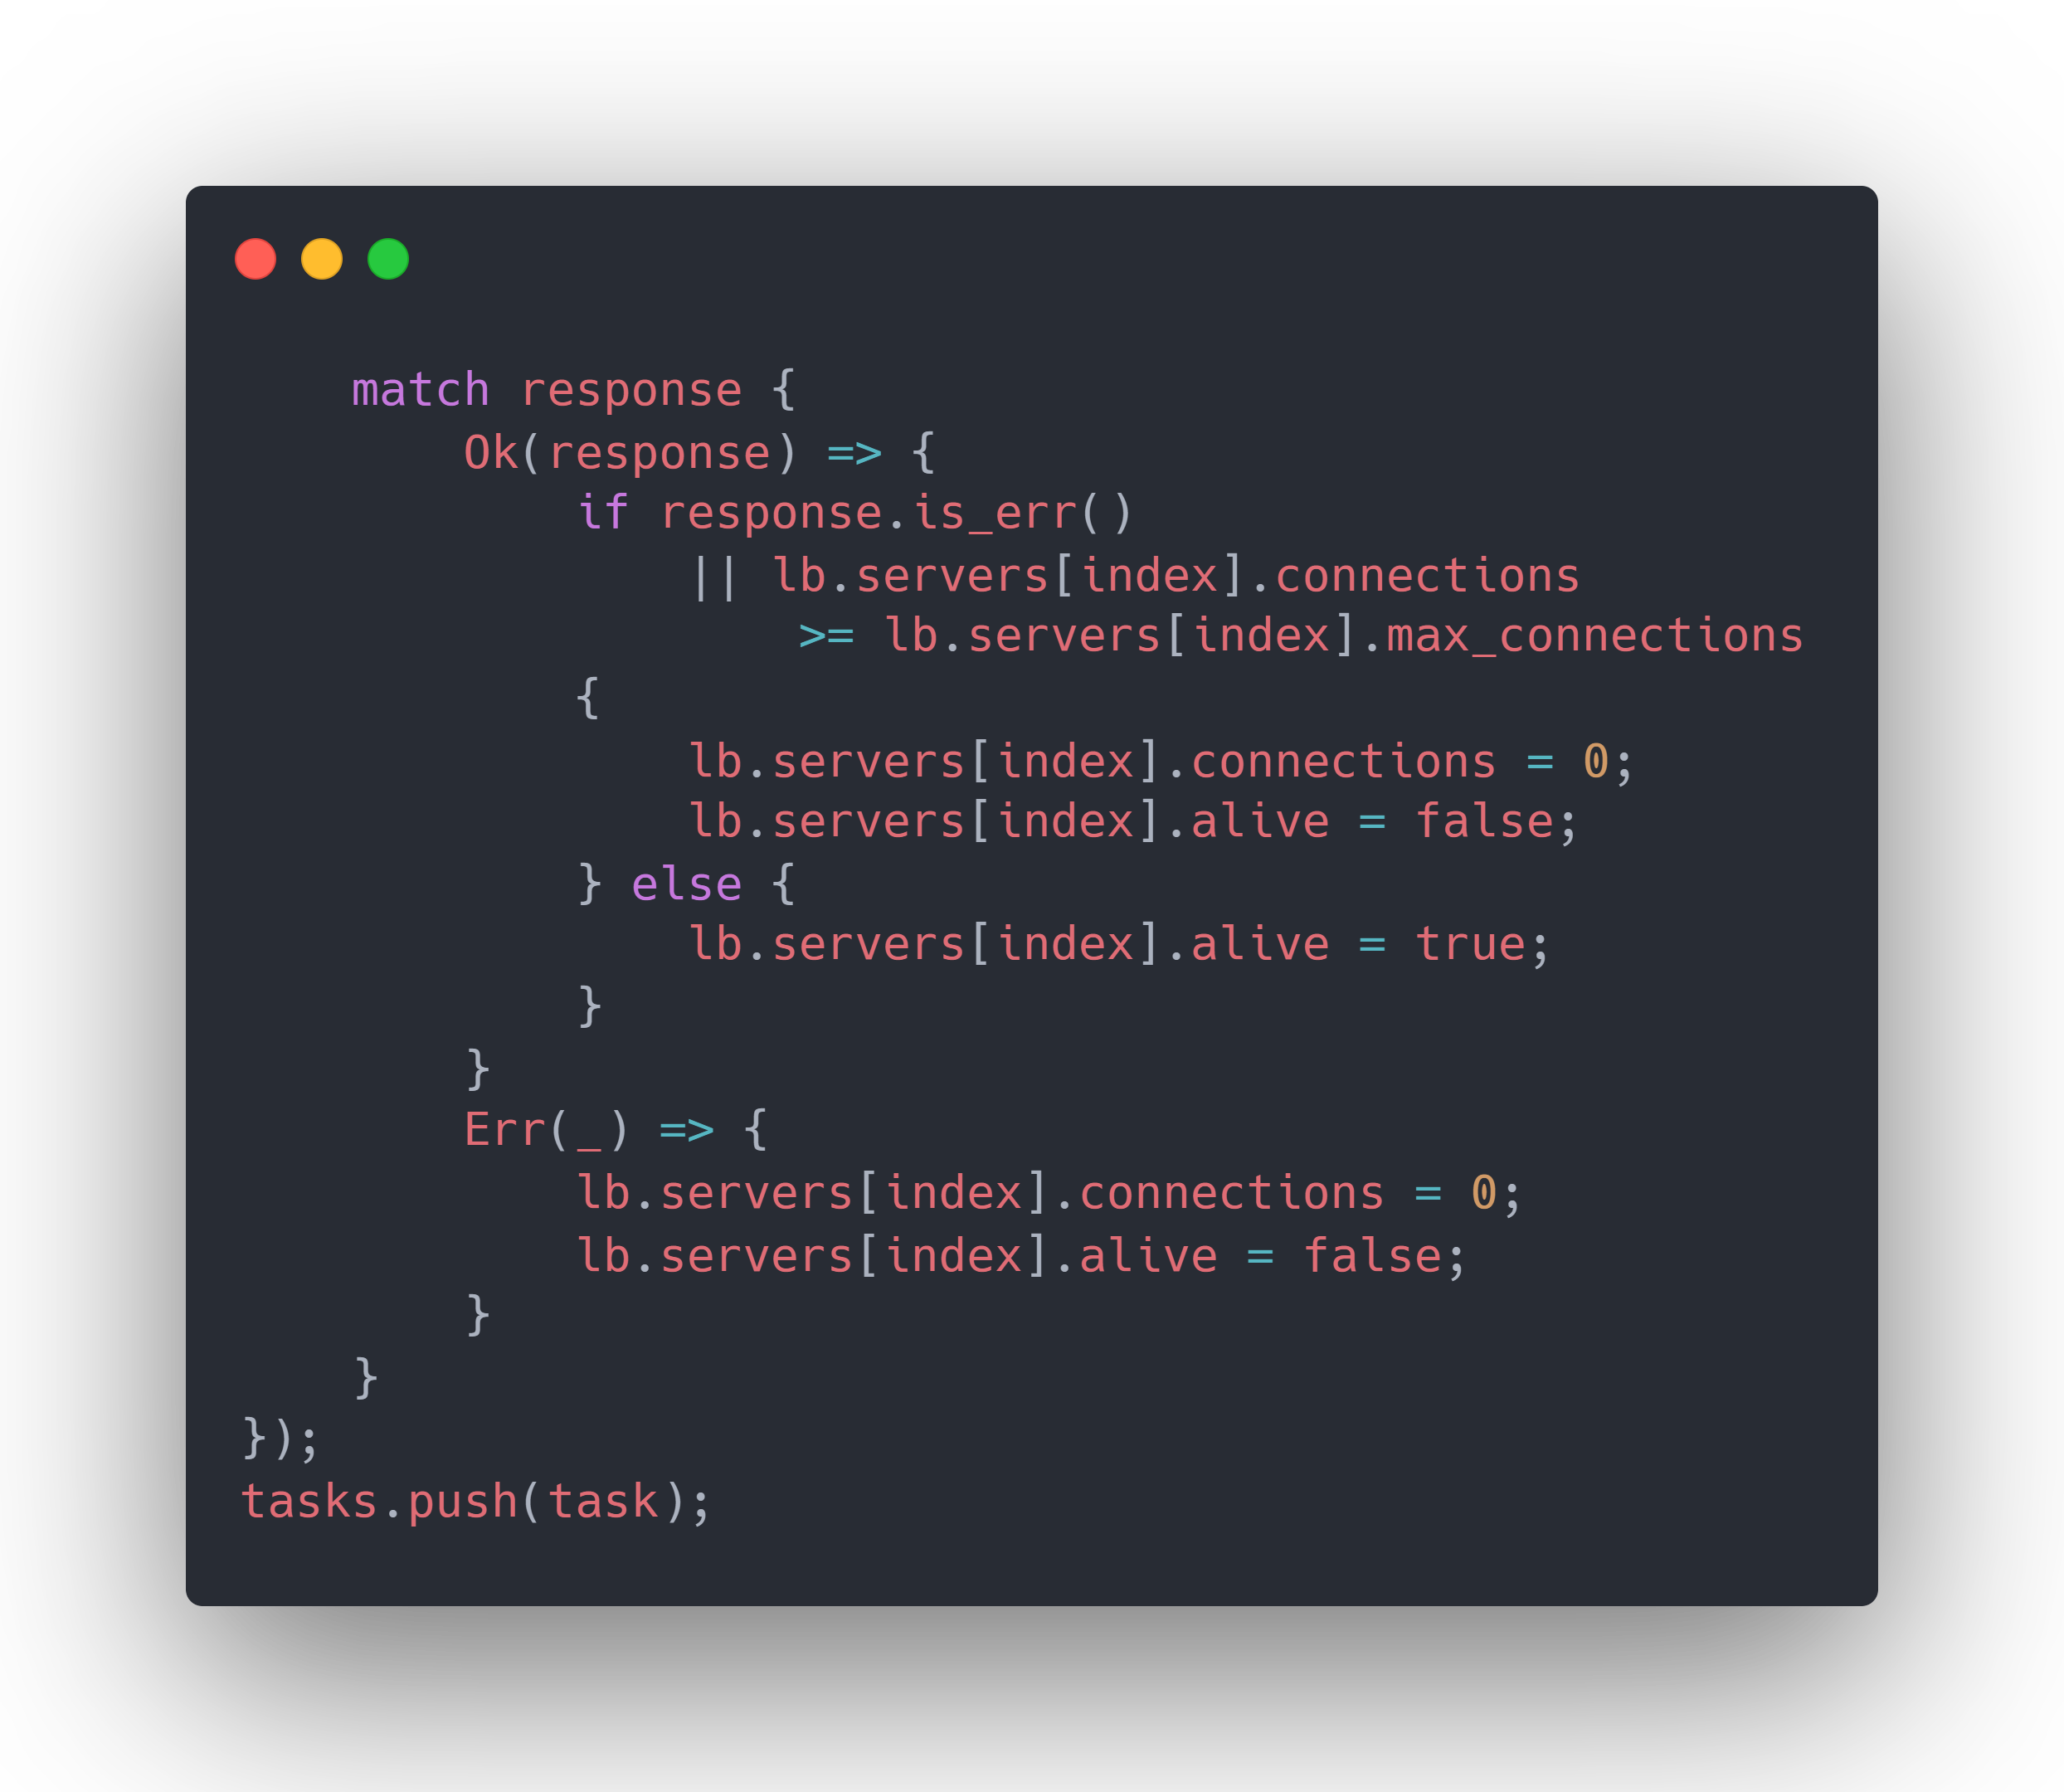
This match block is used to handle the result of the HTTP request sent by the health checker.
If the HTTP request is completed sucessfully, we check if the response is an error code(like 404) or if the maximum connections limit is exceeded. This leads to marking of a server as dead and will not be used by the Load Balancer until it is checked again and marked as alive by the health checker.
This marks the end of the Health Checker. After this, all the server tasks are awaited on to be periodically executed.
Here is a simple flowchart of how the health checking process works:

Health checker reports as displayed in the terminal:

Benchmarks
We conducted several tests at different request rates per second (RPS).
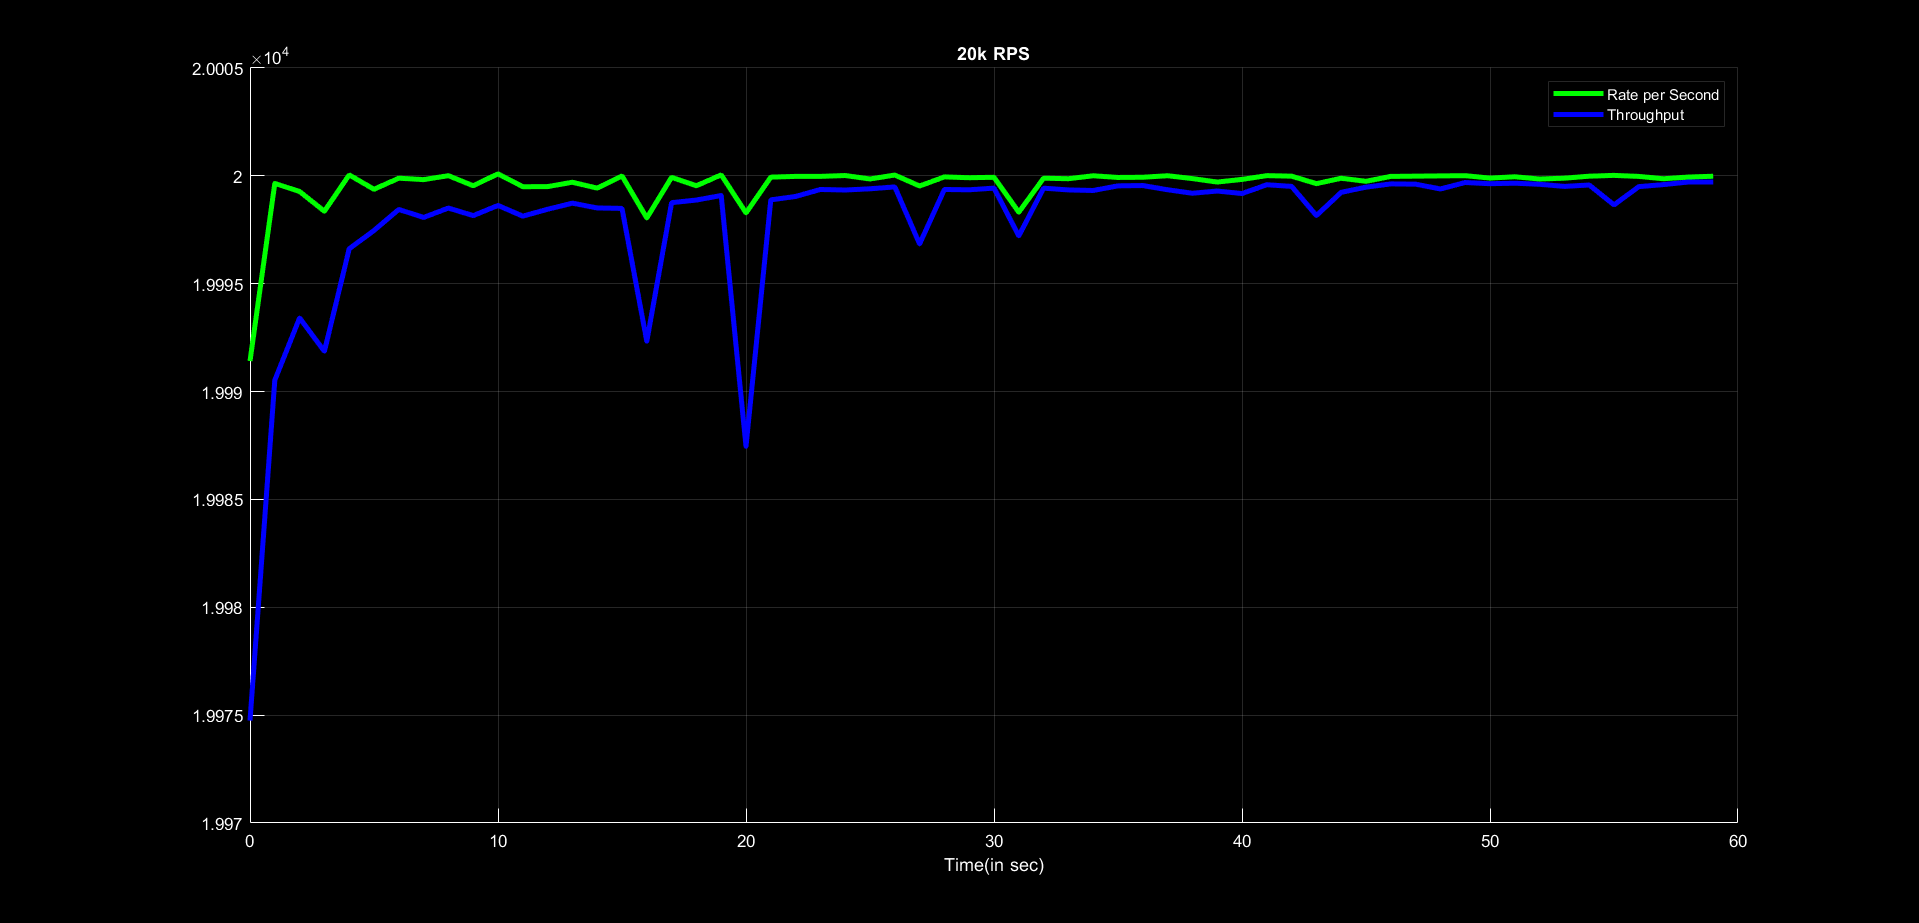
Throughput VS Time at 20,000 RPS
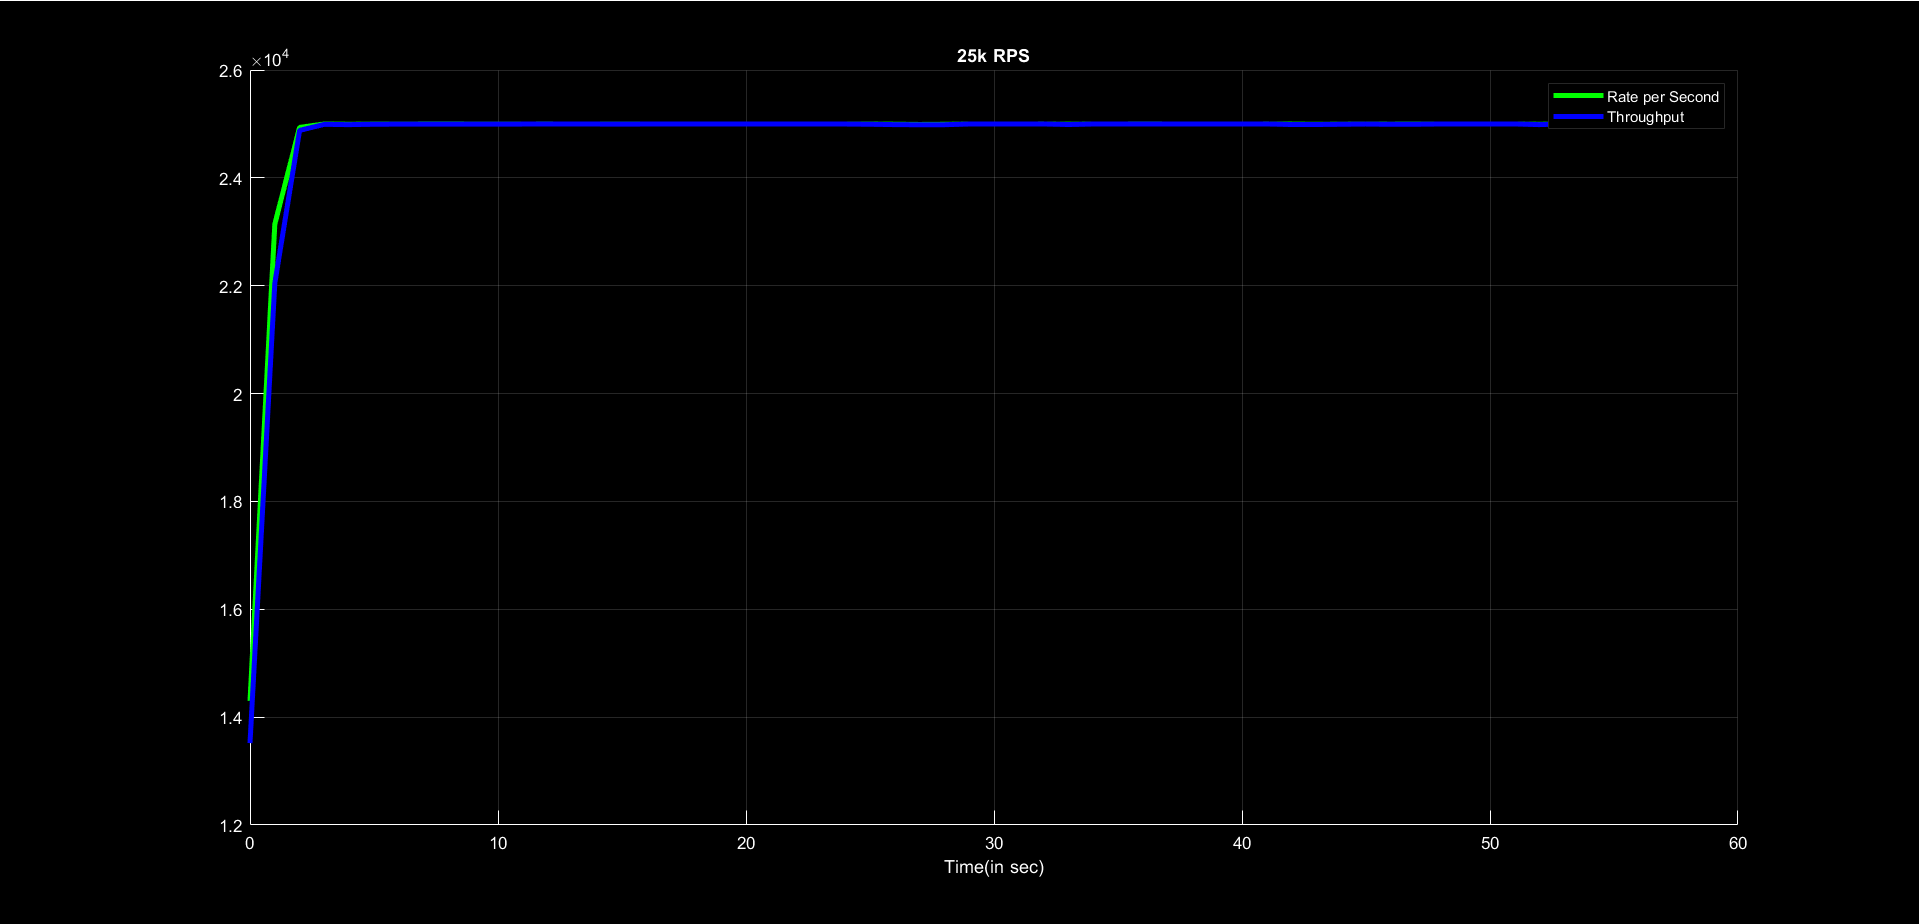
Throughput VS Time at 25,000 RPS
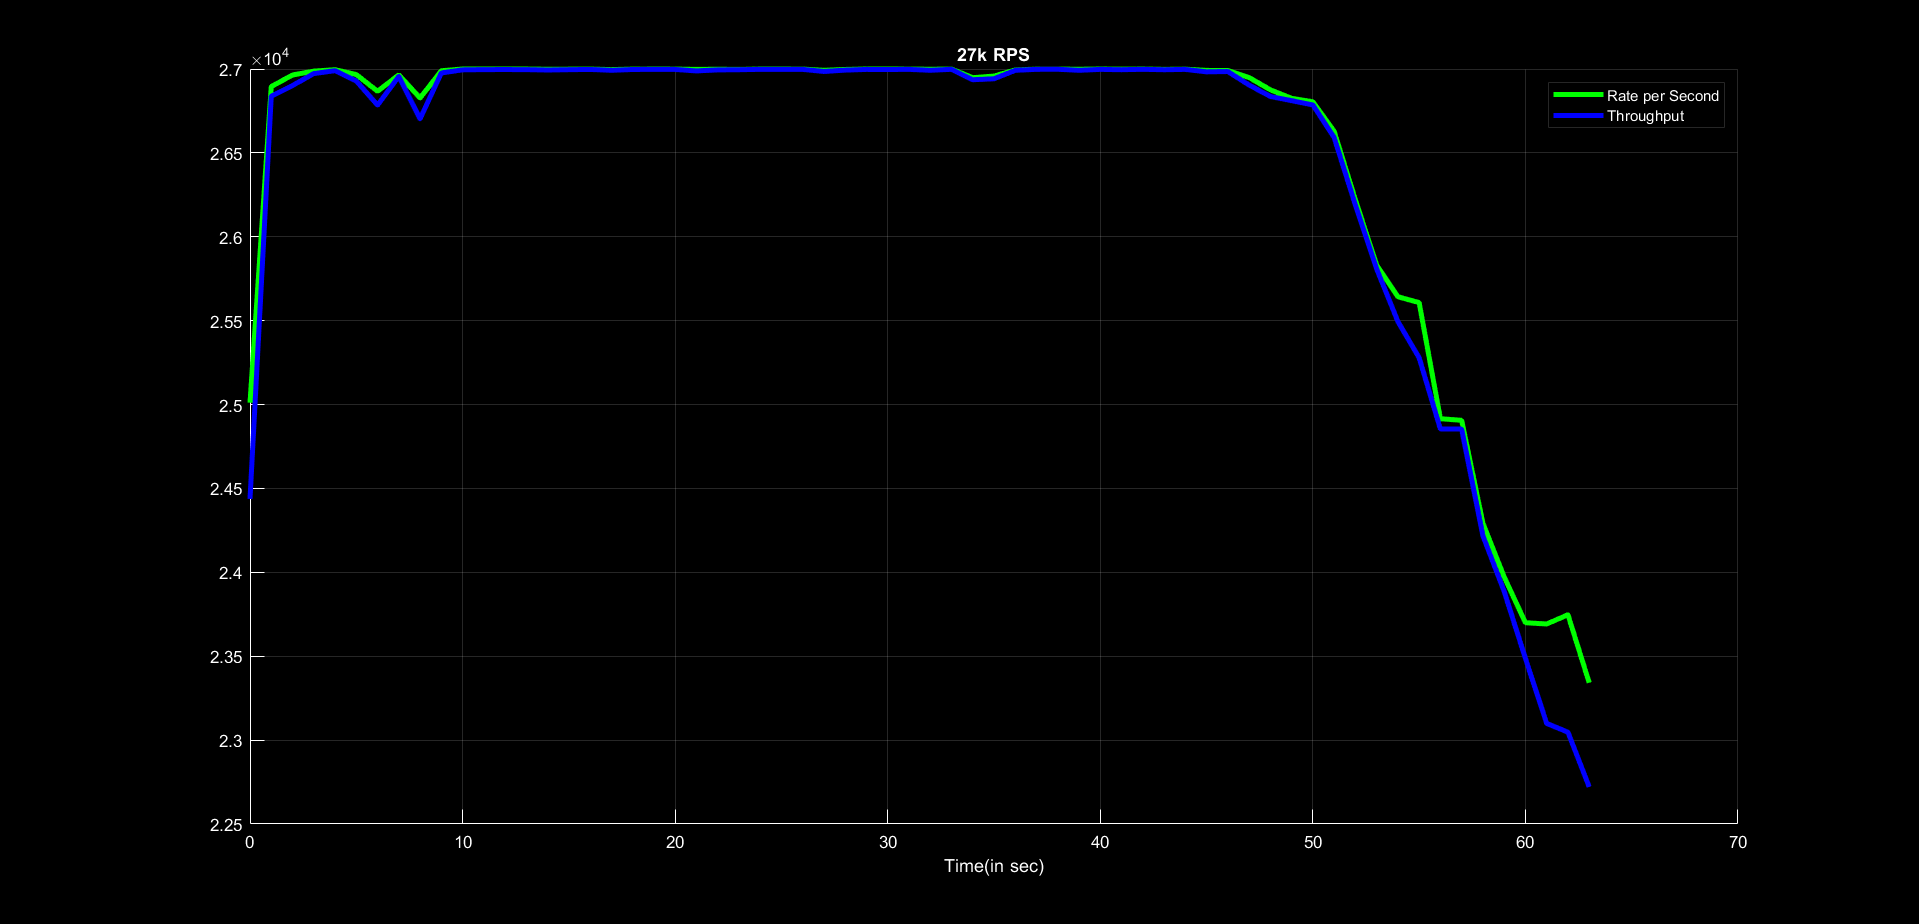
Throughput VS Time at 27,000 RPS
The tests had to be stopped here due to our hardware limitations but the trends we observed show us that the Bal.rs Load Balancer can handle much higher loads.
Experiences
This is a compilation of experiences shared by the Bal.rs mentees
"I decided to explore the field of networking during my vacation and wanted to work on some interesting projects. That's when I got involved with Tilde, working with creating a Layer 7 Load balancer using Rust. We started off in a simple way, getting familiar with Rust, and I quickly found myself enjoying the process. We had a bit of friendly competition within the team as we chose which layers to work on, ultimately developing basic versions of both Layer 4 and Layer 7 load balancers. As we progressed, we moved on to creating a full-fledged Layer 7 load balancer. The challenges we encountered pushed me to think from different perspectives, greatly enhancing my experience. The team's (mentors and peers) support and encouragement made it easy for me to collaborate effectively, making the entire journey both exciting and deeply engaging. I am happy to have worked with such a team." - Raahithya J
"Building a load balancer in Rust over 4 weeks was my first deep dive into Rust, async programming, Hyper, and backend development. It was challenging yet rewarding, teaching me about concurrency, memory safety, and efficient traffic management. This project laid a solid foundation for future backend endeavors." - Pushkar G R
"During the TILDE project, I collaborated on developing a user-friendly Load Balancer in Rust with multiple functionalities. This experience taught me valuable lessons in collaboration and problem-solving. It was enriching, as I met knowledgeable peers and seniors who inspired me to strive for more. Our mentors and seniors were incredibly supportive, providing valuable input for project improvements. I’m grateful to HSP for this opportunity." - Rohan Cyriac
"This project came as a very pleasant surprise to me, as I had not applied for it. Learning a completely new language while working on a rather complicated project was very challenging indeed but also very satisfying. I got to meet and work with some really great people, and their support made the learning curve much smoother. In the end, the experience was truly memorable and I learned a lot" - Pranav V Bhat